Integrations
How to Import / Export data
Before starting to import data in TicTAP, you must understand the data model. The data model is composed of entities and definitions that are fully dynamic and can be created/removed at any time. This means that the data model can be changed at any time.
Import
There are several ways to import or export data in TicTAP. The most common way is to use the integration API. This API allows you to import and export data in json format. You can also import and export data in CSV format in a manual or automatic way.
Export
- Export using REST API
- Manually export CSV file
- Exporting tags
- Exporting entities from list
- Exporting hierarchical entities
Data model
In TicTAP you can create a data model that fits your needs. The data model is composed of entities and definitions that are fully dynamic.
Entities
TicTAP works with entities. Each entity, that can be an asset or just a taxonomy used to categorize assets and has a set of fields that can be filled with data.
For instance: an entity can be a Pump ( asset ) with informed fields such as the serial number, the model, the manufacturer, etc. Or an entity could be a Model with filled fields such as the name, the manufacturer, etc. and it is related to a pump entity and that contains all the shared information between all the pumps of that model.
Entities always have a name and a description that are treated as "own" and are always present in every entity. Besides, entities can optionally have a state that is used to hold a state of the entity across time. For instance: if a dynamic entity was a Task the state could be "In progress", or "Doing", or "Done.
Definitions
All the fields that an entity can have are described in the definition. The definition describes the type of each field, the name of the field, and other properties. Besides, a definition also defines the child structure: which child entities can be added to the entity.
Fields
When editing fields in a definition, you can define the following properties: Each field has a name property that identifies the field, a slug property that is a unique identifier for the field, and a type property that identifies the type of the field. The type can be one of the following:
text: a text fieldemail: an email fielddate: a date fieldchoice: a choice field, with a predefined set of Optionsmedia: a media field, that allows storing Media, that can be restricted with afile_typeto only allow certain types of files, such asimageto restrict to images only orfilefor any other type of file.media_collection: a media collection field, that allows storing a collection of Media.address: an address field, that allows storing an address as text, and a latitude and longitude.manifest_icon: it is the same as a Media field but it is used to store the manifest icon of the App.dynamic_entity: this special field allows creating unidirectional many to one relation from the current definition to another definition. For example: if our definition "Asset" has a dynamic entity field to the definition "Model" means that many assets can be related to one model. This field is special because it is not a field that can be filled with data, but it is a field that allows creating a relation between two entities.
REST API
The documentation of the api can be found in Api Docs page.
This article defines the resources available in the TicTAP integration API. I you need to understand the Data model that TicTaP uses you can read the data model
Access token
In order to access the API it is required having an accessToken. Once you have an accessToken you must include it in every request as a HTTP header
AccessToken: "AccessToken"
If you need to try different API calls you can do it from the same Api Docs page, by using the "authorize" button

Definitions
When using the integration API, you must first understand which definitions are available and which fields are available for each definition. Once you have that information then you can use it to create or update Entities that have those definitions
Listing definitions
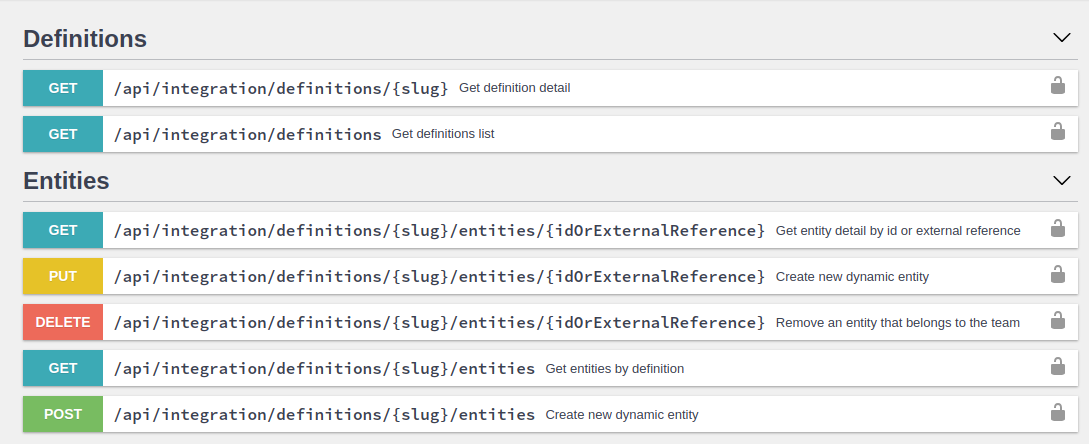
You can get the list of available definitions by calling the endpoint:
GET /api/integration/definitions
This endpoint returns a list of definitions available in your Enterprise. Each definition has a name property that identifies the definition, a slug property that is a unique identifier for the definition, and a fields property that is a list of fields.
This is a response example:
{
  "pages": 11,
  "total": 51,
  "results": [
    {
      "name": "Fire extinguisher co2 5kg",
      "slug": "fire-extinguisher-co-2-5-kg"
    },
    {
      "name": "Ventilació extractors",
      "slug": "ventilacio-extractors"
    },
    {
      "name": "Facility",
      "slug": "facility"
    },
    {
      "name": "Bie",
      "slug": "bie"
    },
    {
      "name": "Pump",
      "slug": "pump"
    }
  ]
}
In the above example, there a list of 51 definitions , but only 5 are returned. This is because the endpoint returns the definitions in pages of limit elements. If you want to get the next page you can use the page parameter:
?page=1&limit=5
The total amount of pages is always returned in the pages parameter
Getting a definition detail
In order to get the list of fields that a given definition has, it is necessary to make a request to get the detail for a given definition slug.
GET /api/integration/definitions/{slug}
This is an example:
GET /api/integration/definitions/bie

// Response:
{
  "name": "Bie",
  "slug": "bie"
  "fields": [
    {
      "type": "text",
      "name": "Model",
      "required": false,
      "indexable": true,
      "slug": "model",
      "localized": false
    },
    {
      "type": "text",
      "name": "Product reference",
      "required": false,
      "indexable": true,
      "slug": "product-reference",
      "localized": false
    },
    {
      "type": "date",
      "name": "Date",
      "required": false,
      "indexable": false,
      "slug": "date",
      "localized": false
    },
    {
      "type": "text",
      "name": "Location",
      "required": false,
      "indexable": false,
      "slug": "location",
      "localized": false
    }
  ]
}
Every field has a slug, which identifies it uniquely and it will be used when creating/editing entities of that given definition.
Every field also has a type that defines the type of data that is stored in that field: text, choice, media, media_collection ... You can find a reference of all field typesin the data model
Entities
Create an entity
Once we know the definition we can create an entity for that definition:
POST /api/integration/definitions/{slug}/entities
This is an example when creating an entity for the definition bie:
POST /api/integration/definitions/bie/entities

// Request body:
{
    "name": "Bie 1",
    "values": {
      "model": "Model 1",
      "product-reference": "Product reference 1",
      "date": "2020-01-01",
      "location": "Location 1"
    }
}
When some of the fields is of type media or media_collection ( e.g. documents ) , the request must use the multipart/form-data content type and the value of the field must be a file.
In the following example, the field documents is of type media_collection and it is a list of files. The field photo is of type media and it is a single file.
POST /api/integration/definitions/bie/entities

AccessToken: {AccessToken}
Content-Type: multipart/form-data; boundary=----WebKitFormBoundary

------WebKitFormBoundary
Content-Disposition: form-data; name="name"

Bie 1
------WebKitFormBoundary
Content-Disposition: form-data; name="values[model]"

Model 1
------WebKitFormBoundary
Content-Disposition: form-data; name="values[photo]"
Content-Type: image/png

< /home/debian/pictures/photo.jpeg
------WebKitFormBoundary
Content-Disposition: form-data; name="values[documents][]"; filename="document1.png"
Content-Type: image/png

< /home/debian/documents/document1.pdf
------WebKitFormBoundary
Content-Disposition: form-data; name="values[documents][]"; filename="document2.pdf"
Content-Type: image/jpg

< /home/debian/documents/document2.pdf
------WebKitFormBoundary--
Update an entity
When updating a given entity, the request is the same as when creating an entity, but the method is PUT and the endpoint is:
PUT /api/integration/definitions/{slug}/entities/{id}
The entities id are UUIDs. This is an example when updating an entity for the definition bie:
PUT /api/integration/definitions/bie/entities/a3f4509a-6060-4526-9bae-4a2cbd8f52b5

// Request body:
{
    "name": "Bie 1 updated",
    "values": {
      "model": "Model 1 updated",
      "product-reference": "Product reference 1",
      "date": "2023-01-02",
      "location": "Location 1"
    }
}
Delete an entity
When deleting a given entity, the request is a DELETE request to the endpoint:
DELETE /api/integration/definitions/{slug}/entities/{id}
External reference
When creating or updating an entity, it is possible to add an external reference to the entity. This is useful when you want to link the entity with an external system. For example, if you have SAP and you want to link the entity with a given SAP object, you can add the SAP object id as an external reference.
The external reference is a string that must be unique for the given definition. This means that if you create an entity with an external reference, you cannot create another entity with the same external reference.
The external reference is added to the entity in the external_reference field. For example:
POST /api/integration/definitions/bie/entities

// Request body:
{
    "name": "Bie 1",
    "external_reference": "SAP-1234",
    "values": {
      "model": "Model 1",
      "product-reference": "Product reference 1",
      "date": "2020-01-01",
      "location": "Location 1"
    }
}
A external reference can be updated when updating an entity. For example:
PUT /api/integration/definitions/bie/entities/a3f4509a-6060-4526-9bae-4a2cbd8f52b5

// Request body:
{
    "name": "Bie 1 updated",
    "external_reference": "SAP-UPDATED-1234",
    ...
}
IMPORTANT: when updating an entity and the external_reference is not informed, or it is empty, the current external reference is removed from the entity.
Entity's "parent"
When creating or updating an entity, it is possible to add a "parent" to the entity. The parent refers to the higher level entity that contains the entity. For example, if you have a definition facility and a definition room, the room entity can have a parent that is a facility entity. To express this through the API you can add the parent_id field to the entity.
For example:
POST /api/integration/definitions/room/entities

// Request body:
{
    "name": "Room 1",
    "parent_id": "a3f4509a-6060-4526-9bae-4a2cbd8f52b5"
    ...
}
and it is also possible to use the "external reference" of the parent entity:
POST /api/integration/definitions/room/entities

// Request body:
{
    "name": "Room 1",
    "parent_id": "SAP-FACILITY-1234"
    ...
}
This can also be accomplished when updating an entity, which causes a "move" of the entity to another parent. For example:
PUT /api/integration/definitions/room/entities/room-uuid

// Request body:
{
    "name": "Room 1",
    "parent_id": "SAP-ANOTHER-FACILITY"
    ...
}
IMPORTANT: It is NOT possible to leave an entity "orphan". When updating an entity and the parent_id is not informed, or it is empty, the current parent will remain unchanged.
Import data
How to Import data to the platform
Manually import with CSV file
In TicTAP you can manually import data from a CSV file. This is useful when you want to import data from a third party system or when you want to import data from a spreadsheet.
Import from the list
The first step to import data from a CSV file is navigate to the entity list of the definition you want to import data. For example, if you want to import data for the definition bie, you must navigate to the entity list of the definition bie:
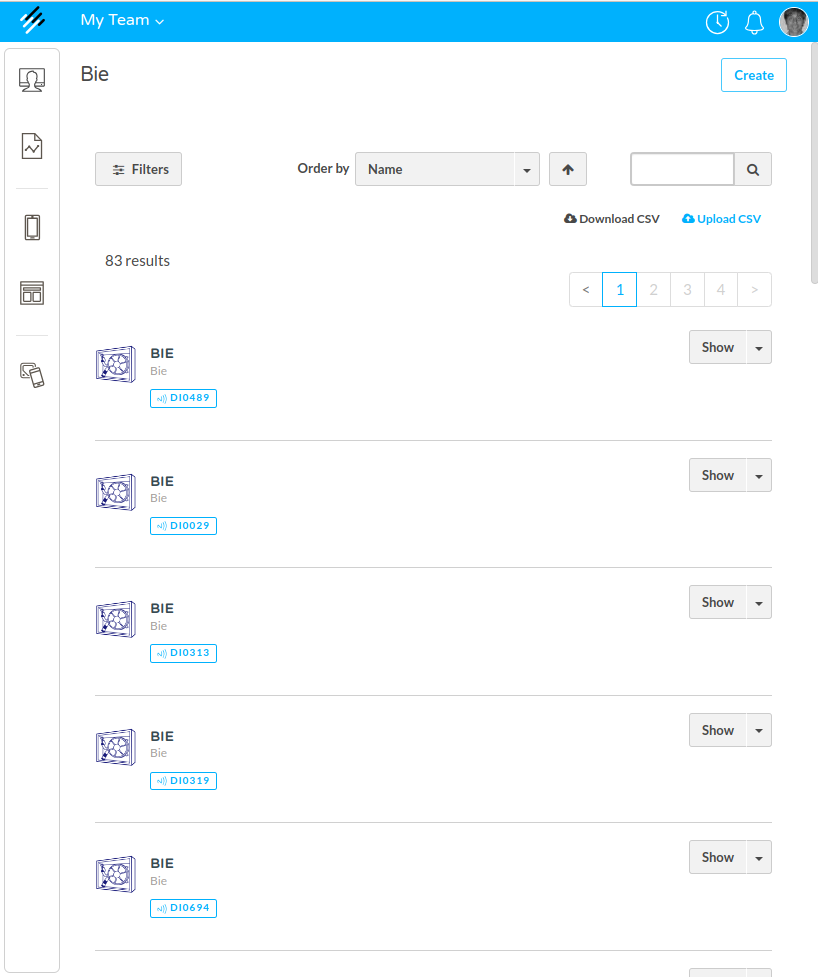
Once you are in the entity list, you must click on the import button:
![]()
When you click on this button you need to select a CSV file from your computer. The CSV file must have a header row with the names of the fields that you want to import.
Map the fields
The system will automatically show a dialog where you can map every column of your CSV file to a field of the definition. If you don't map a column, the system will ignore that column.
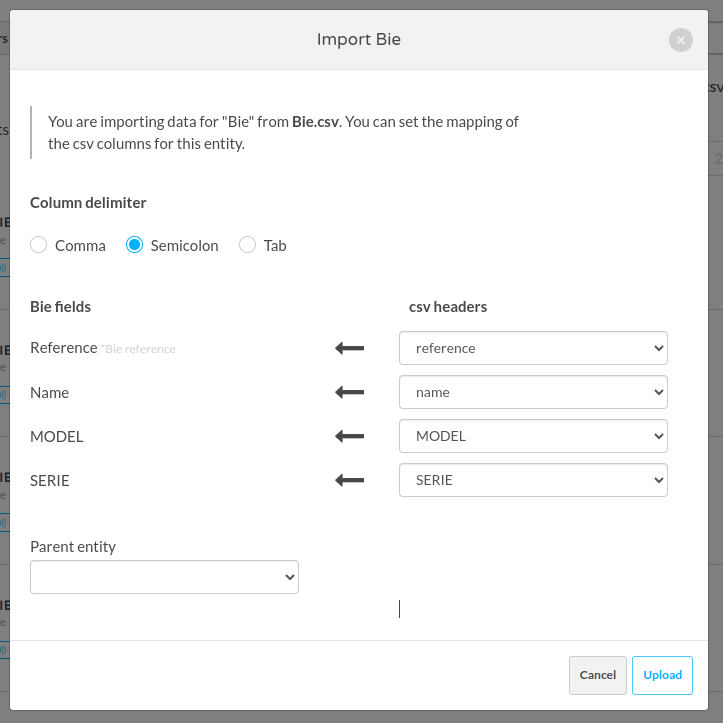
Special fields
There are some special fields that you can map:
-
reference: This field is used to identify the entity. If you map this field, the system will try to find an entity with the same value in the fieldreference. If the system finds an entity with the same value, then the system will update that entity. If the system doesn't find an entity with the same value, then the system will create a new entity. -
parent entity: This field allows importing the list of entities as a tree. If you map this field, the system will try to find aparentfor each of the imported entities using the parentreference. If the system finds a parent entity with the same value in the fieldreference, then the system will set that entity as the parent of the imported entity. If the system doesn't find a parent entity with the same value, then the system will create a new entity without a parent. -
Media fields: some of the fields in the CSV can contain the name of a file. If you map a field that is a media field, the system will try to find a file with the same name in the media library. If the system finds a file with the same name, then the system will set that file as the value of the field. If the system doesn't find a file with the same name, then the system will give an import error.
Import CSV file with FTP
You can also import CSV files using SFTP: to do this, the TicTAP Team will create a folder in the FTP server ( sftp://ftp.tictap.me ) having an inbox and an outbox folder.
First of all, a known mapping configuration must be created by the TicTAP Team. This configuration allows the system knowing which column in your CSV maps to which definition field.
Using .lock
In order to let the system know that you have uploaded data to the inbox folder, a semaphore is being used in the following way:
- You need to upload a file named
.lock. This file is used to avoid the system processing the file while you are ready uploading. - Then you upload a file named
.csv. This file is the CSV file that you want to import. - If the
.csvfile has media fields, you need to upload the media files to theinbox/mediafolder too. Every media file must have the same name as the value of the media field in the CSV file. - Remove the
.lockfile.
When you remove the .lock file the system will start processing the .csv file and the media files. Firstly, it will upload every media file to the media library. Then it will import the CSV file.
Many CSV files
It is possible to upload several files related between them. For example, we could upload a list of bie entities and each of them having a relation to a model entity. In this case, we need to upload the CSV files in the following order:
- Upload the
.lockfile. - Upload the
.csvfile with thebieentities. - Upload the
.csvfile with themodelentities. - Upload the media files.
- Remove the
.lockfile.
Using the outbox folder
When the system finishes processing the CSV file, it will log the result in the outbox folder.
The result will be a file named {csv_file}.log with the same name as the CSV file that you uploaded. This file will contain the result of the import process. If the import process was successful, the file will contain the list of entities that were created or updated. If the import process failed, the file will contain the list of errors.
Besides, it is also possible to configure having certain output .csv files in the outboux folder under certain events. For instance, the system could create a .csv file every time an entity has been edited of marked as end of life , or when a new entity has been created and many other events supported, such as reminder_created , state_changed , submission_received...
In the integration phase, the TicTAP Team will create the right configuration to decide under which events the information needs to be created in the outbox folder.
Import workspace
The import feature in TicTAP allows you to add assets within a workspace by importing a structured hierarchy from a specific node and all its children (the entire descendant tree). It is also possible to import directly at the workspace root node (level 0).
Step 1: Export the Sample Structure
To understand the required structure for import, first export an example Excel file from an existing workspace. When opening the exported file, you can see:
- The hierarchy of nodes with their names.
- The level each node occupies (0 for location, 1 for category, 2 for articles).
- The asset type associated with each node (e.g., location, category, article).
Example structure in Excel:
| Level 0 | Level 1 | Level 2 | Type | Reference | State | Last Used | Photo Reference | Photo | Quantity | Supplier Reference |
|---|---|---|---|---|---|---|---|---|---|---|
| Calabria | Location | 123 | ||||||||
| Calabria | Material envíos TicTAP | Category | 1234 | |||||||
| Calabria | Material envíos TicTAP | Bolsas PE Autocierre 12x18 | Article | 12345 | ok | 87914 | bolsas.JPG | 49 |
 Import preview showing nodes and number of items per category
Step 2: Upload the File to Import
To start the import:
- Select the node within which you want to import assets (e.g., the root node "Calabria" or any child node at level 1).
- Use the option to import CSV or Excel file.
- Select the exported or compatible structure file.
When loading the file, a window appears to select the CSV/XLSX file.
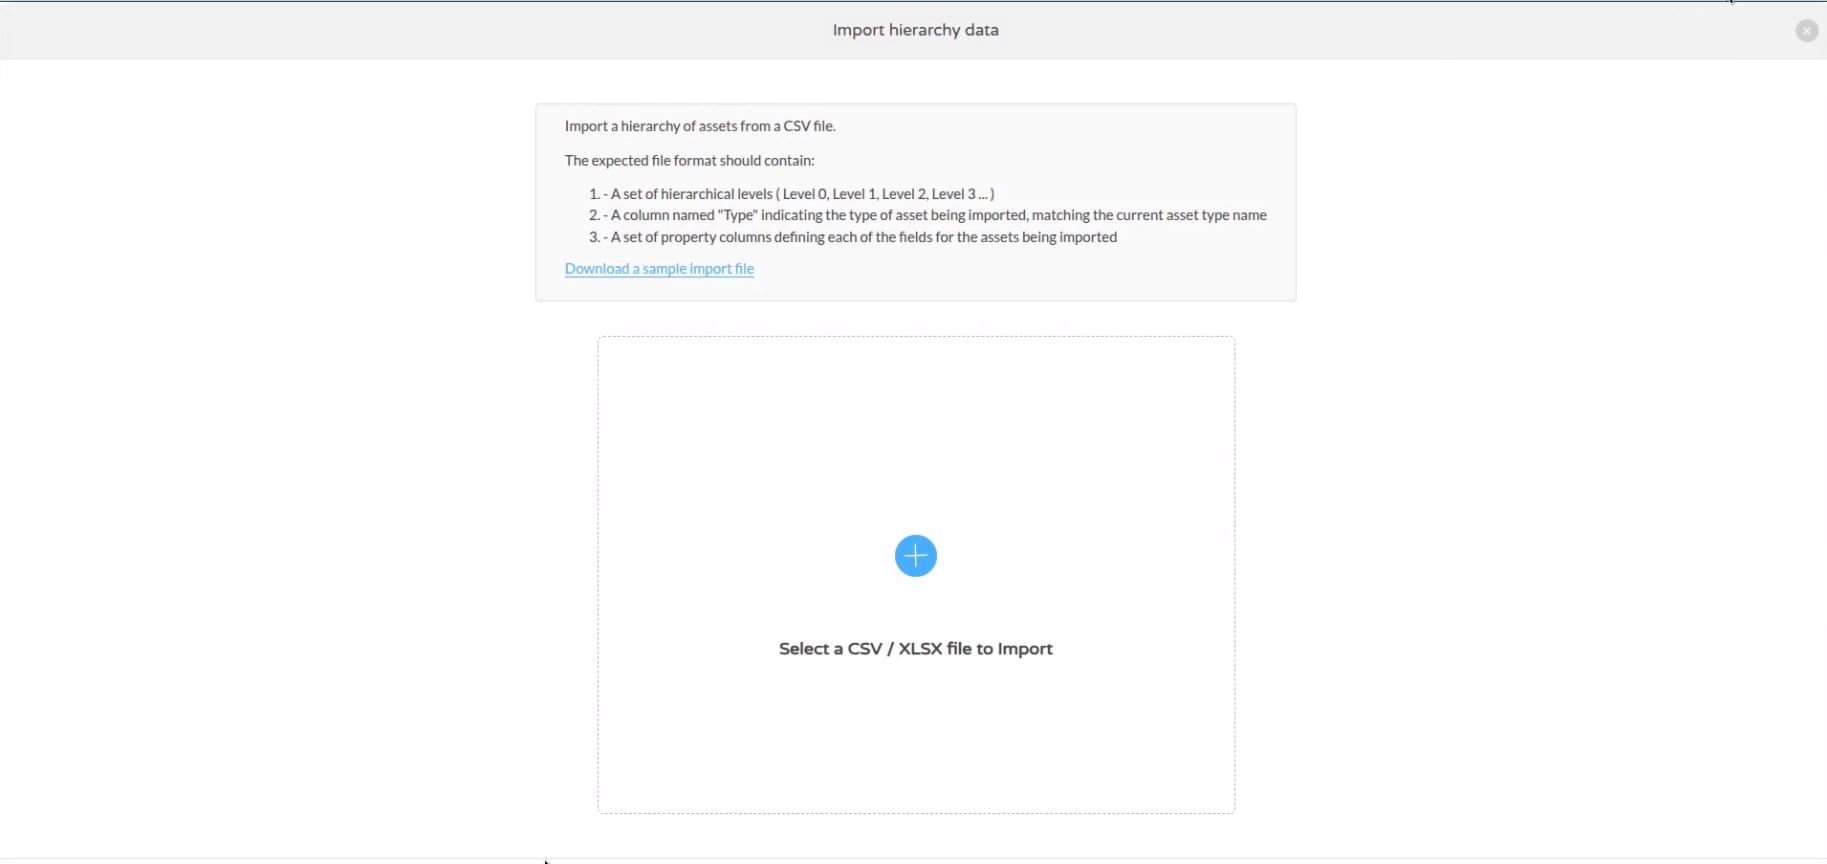
File selection screen for CSV / XLSX import
Step 3: Import Preview
The system shows a preview with a summary tree:
- Total number of detected items (e.g., 36 items).
- Distribution by type (Location, Category, Article).
- Ability to select which parts you want to import.
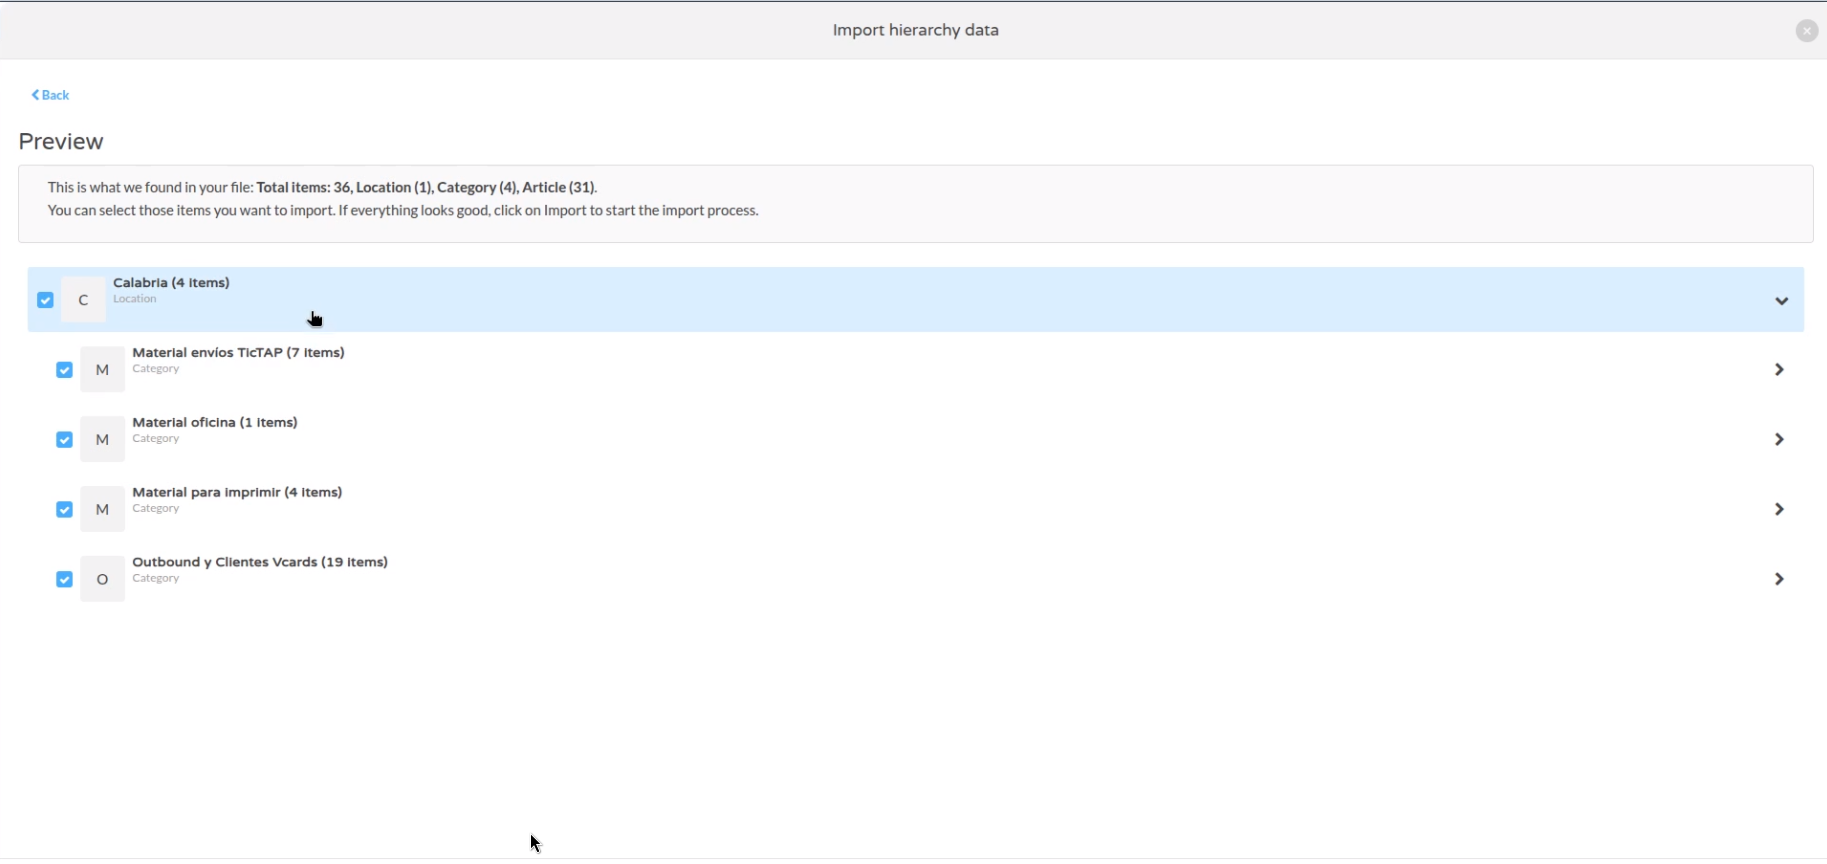
Summary of elements detected in the file before importing
Step 4: Field Mapping
Next, map each column in the file to the system fields for each asset type.
For example, for the Article type, you can map:
- Item level (Level 2)
- Name / Reference
- Last Used date
- Photo (associated reference)
- Quantity
- Supplier
- Minimum/maximum stock
- Stock unit cost
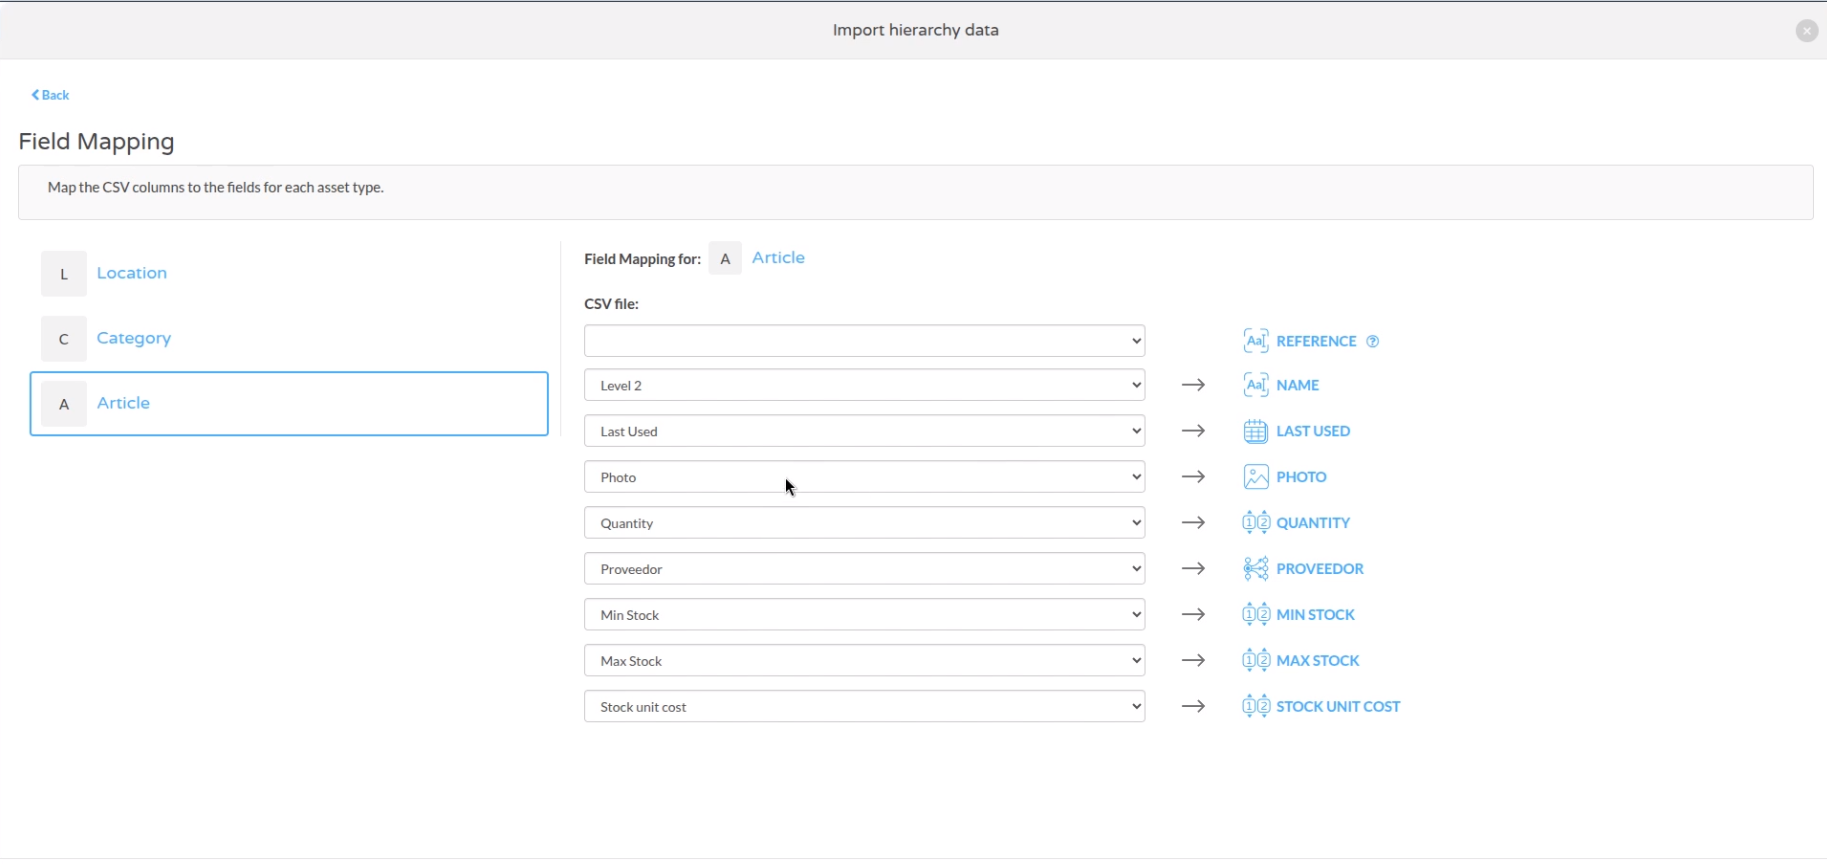
Example of mapping CSV columns to asset fields for import
Key Notes
- For properties related to other assets (photo, supplier, etc.) use the reference to avoid duplicates.
- The file should have flat data without formulas; CSV is recommended to avoid issues.
- Supports import of URLs for images and PDF documents (datasheets).
- The system downloads and assigns these URLs to the asset during import.
Export data
How to export data from the platform
Manually export CSV file
It is possible to export many lists in CSV format. In TicTAP it is possible to export the following lists:
- Entities : This list contains all the entities of a certain type. For example, all the
bieentities. - Form submissions: This list contains all the form submissions sent by the users in a date period.
- Tags: This list contains all the tags , which can be NFC tags or QR codes.
Export entities
To export entities of a given definition, you can do it from the list of entities. In the top right corner of the list, there is a button to export the list in CSV format.
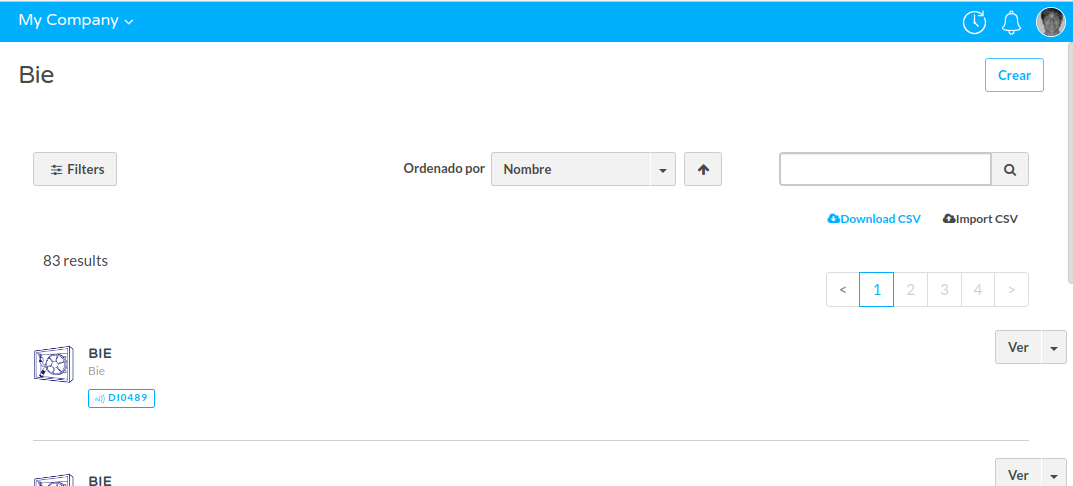
When you click on the button, the browser will download a CSV file with the entities of the list and all their fields. These are the columns you will find in the CSV file:
referencecolumn will indicate the reference of the entity. The reference is a unique identifier that is used to reference the entity from external systems.namecolumn will indicate the name of the entity. If the entity has no name, the column will be empty.Localized fieldswill be exported in different columns, one for each language. For example, if the entity has a field calledjob positionand it is localized, the CSV file will have a column calledjob position enand another column calledjob position es( for english and spanish respectively ).tag codescolumn will indicate the NFC tags or QR codes that is associated with the entity. If the entity has no NFC tag or QR code associated, the column will be empty.tag skuscolumn will indicate the NFC tags or QR skus code that is associated with the entity. If the entity has no NFC tag or QR code associated, the column will be empty.parentcolumn will indicate the parent entity of the entity. If the entity has no parent, the column will be empty.parent referencecolumn will indicate the parent reference of the entity. If the entity has no parent, the column will be empty.EOLcolumn means "End of life" and it is a date that indicates when the entity was archived. If the entity is not archived, the column will be empty.createdcolumn indicates when the entity was created.updatedcolumn indicates when the entity was updated.
This is an example of a CSV file with the entities of the definition bie:

Export form submissions
You can export the form submissions from the Analytics/Forms page, by clicking the Download data link. Filtered data
will be downloaded in CSV format
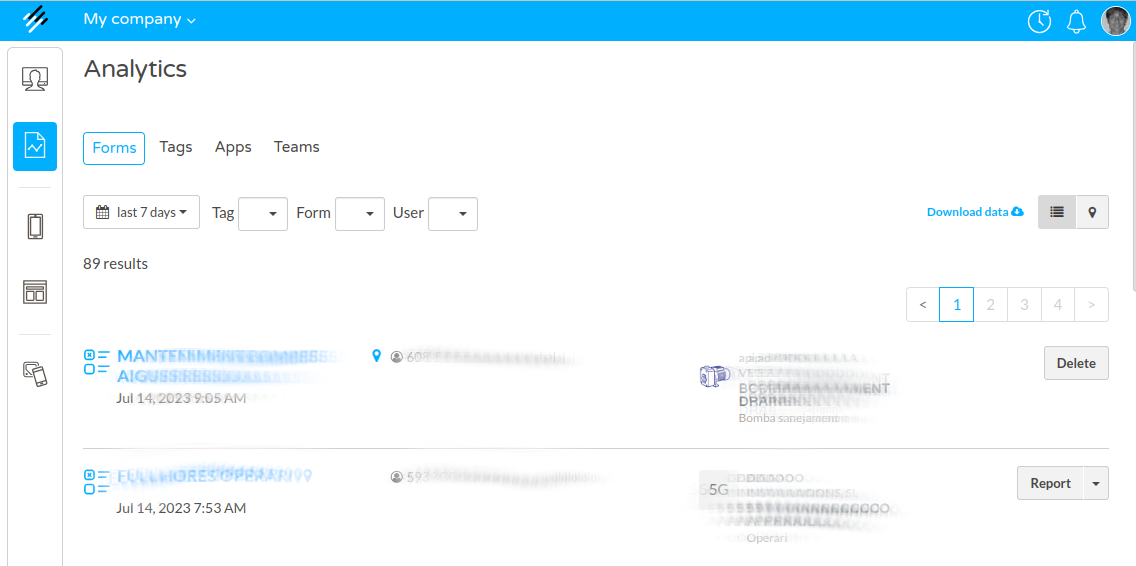
The CSV file format for submissions includes every block label used in the templates and the filled values for each
submission. Every row in the CSV file will include:
__form: the form name__date: the submission date__frontUser: the user name, when the form was submitted by a front user. If the form was submitted by an anonymous user, the value will be empty.__tagName: the tag SKU or code, when the form was submitted by scanning a tag
Export tags
You can also export a list of tags from the tags view. In the top right corner of the list, there is a button to export CSV.
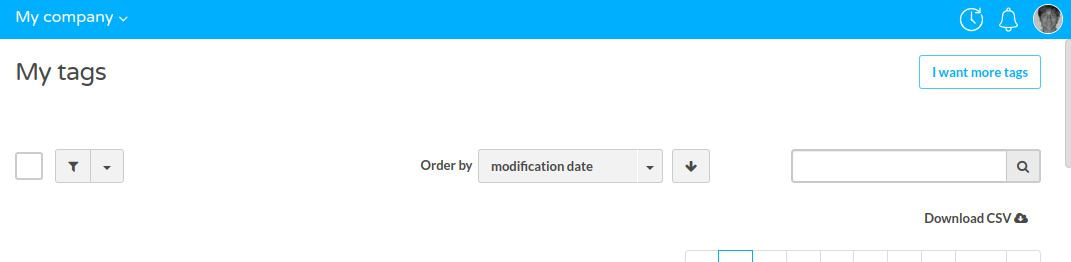
When you click on the button, the browser will download a CSV file with the tags of the list and all their fields. The CSV file will have the following columns:
namecolumn will indicate the name of the tag.skucolumn will indicate the sku of the tag.urlcolumn will indicate the url of the tag.descriptioncolumn will indicate the description of the tag.registration datecolumn will indicate the date when the tag was registered.registered bycolumn will indicate the user who registered the tag.labelscolumn will indicate the labels of the tag.
Webhooks
Webhooks allow informing third-party applications every time something happens in tictap. For example, every time a form is submitted, every time a reminder expires, every time an asset reaches end of life, every time an asset transitions from one state to another, etc.
Webhooks provide flexibility in cases where it is desired that an action occurs upon certain events occurring in tic tap.
Export PDF
Export PDF from a form submission
When a form as configured reports, it is possible to export the form submission as a PDF file. To do so, you need to
- Go to the form submission list
- Press the button "Report" in the form submission you want to export
It can also be done from the detail view of the form submission, by pressing the button "Report" in the top right corner of the page.
When you click on the button, the browser will download a PDF file with the form submission data.
Entity reports
From the Workspace view , when there are configured reports for an entity, it is possible to export the entity report as a PDF.
In order to do so, you need to:
- Go to the entity detail view
- Press the button "Report" in the top right corner of the page
- Configure the date range for the report: this will allow including all the form submissions that were sent to a specific entity in a date range.
- Press the button "Generate report"
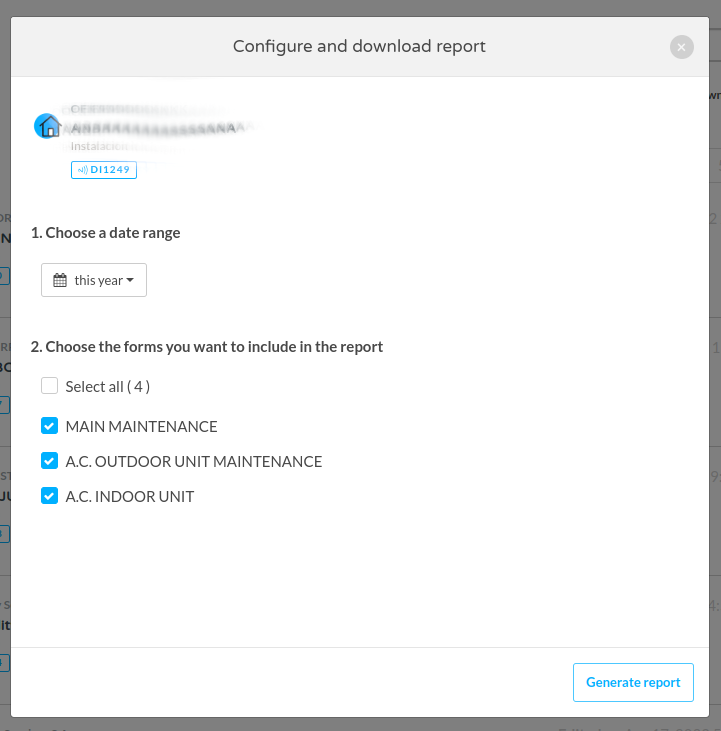
When you click on the button, the browser will download a newly generated PDF file with the entity report.