Asset management
Introduction
In TicTAP, the asset management workflow is focused on organizing and managing your physical assets. By linking tags to assets, you can track their location, status, and associated content. Here's how to manage your assets through the workspace.
Working in the Workspace
The Workspace is where you manage asset information, locations, and statuses. It provides a hierarchical view of all your assets, allowing you to organize them into levels and categories.
Navigating the Workspace:
- The workspace is structured in levels, where each level represents a category (e.g., Location Warehouse, Asset Type).
- Select a specific asset to view its details, including the assigned tag and asset status.
Now that you understand the asset management workflow, you can fully leverage TicTAP's capabilities. If you're ready to explore content creation, refer to the Content Creation guide.
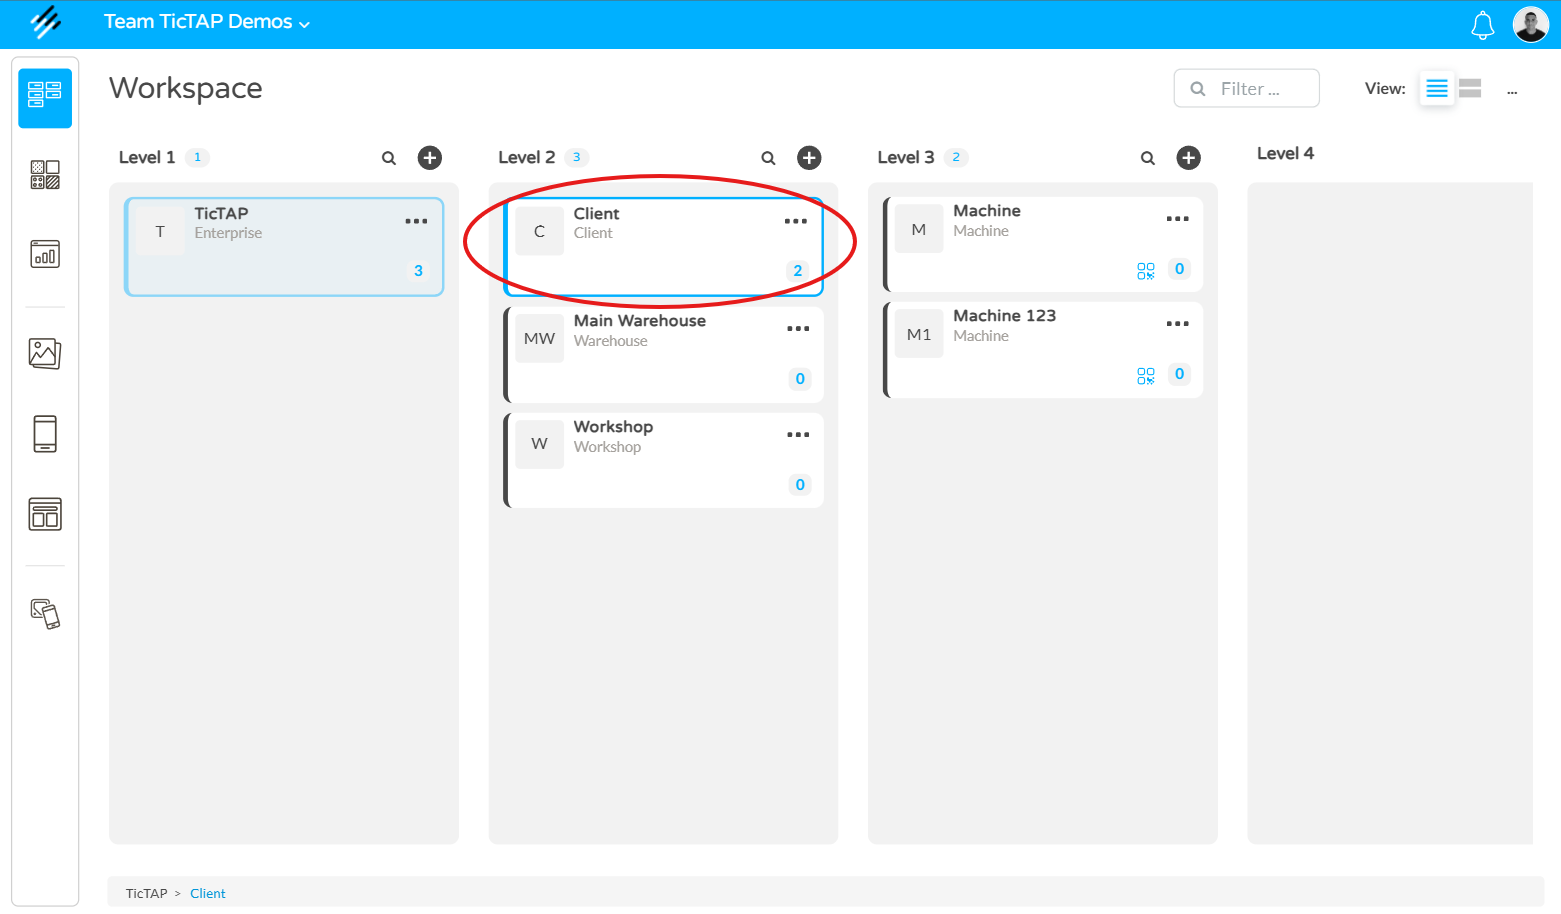
Workspace
The Workspace is the core interface of TicTAP, providing users with a structured view of their locations, assets, and services. It allows easy navigation through various hierarchical levels, each representing different organizational or operational categories.
Structure of the Workspace
The workspace is divided into multiple levels, which help users navigate through locations and manage assets efficiently.
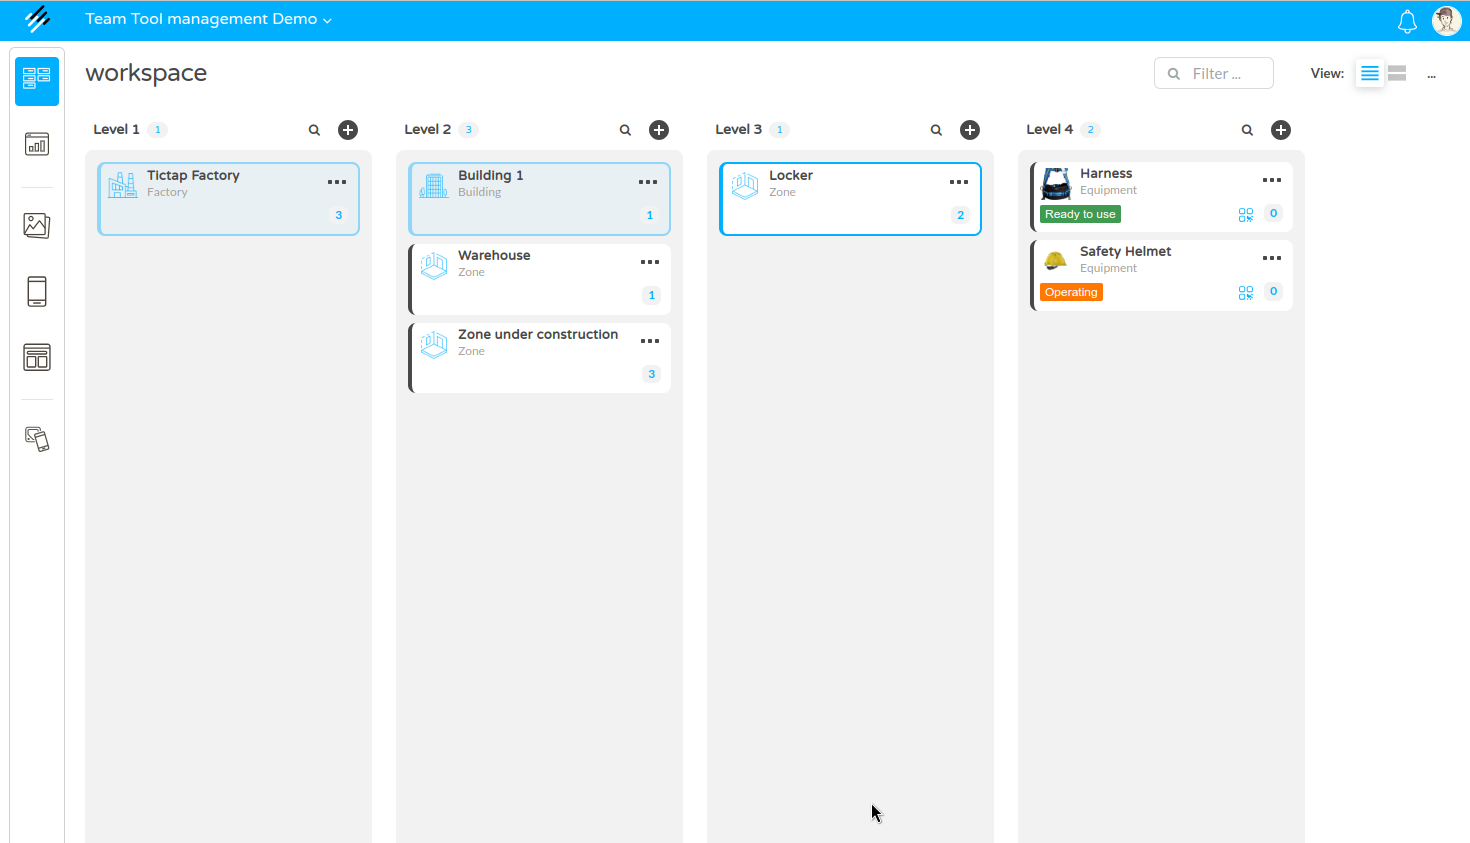
- Level 1
The top-level overview displays major categories such as locations or departments. For example, in the screenshot, TicTAP Factory is selected. - Level N
This level dives deeper into subcategories or departments within Level 1. In the example there are Building and Zone categories found, which are possible under the Factory level.
The hierarchy configuration depends on your enterprise configuration, and it is completely dynamic. You can learn more about how to customize your asset hierarchy in the Customize guide
Asset Details
When you select a specific asset (in this case, Harness), a detailed panel appears on the right side of the screen, displaying key information. This panel provides a comprehensive overview of the selected item:
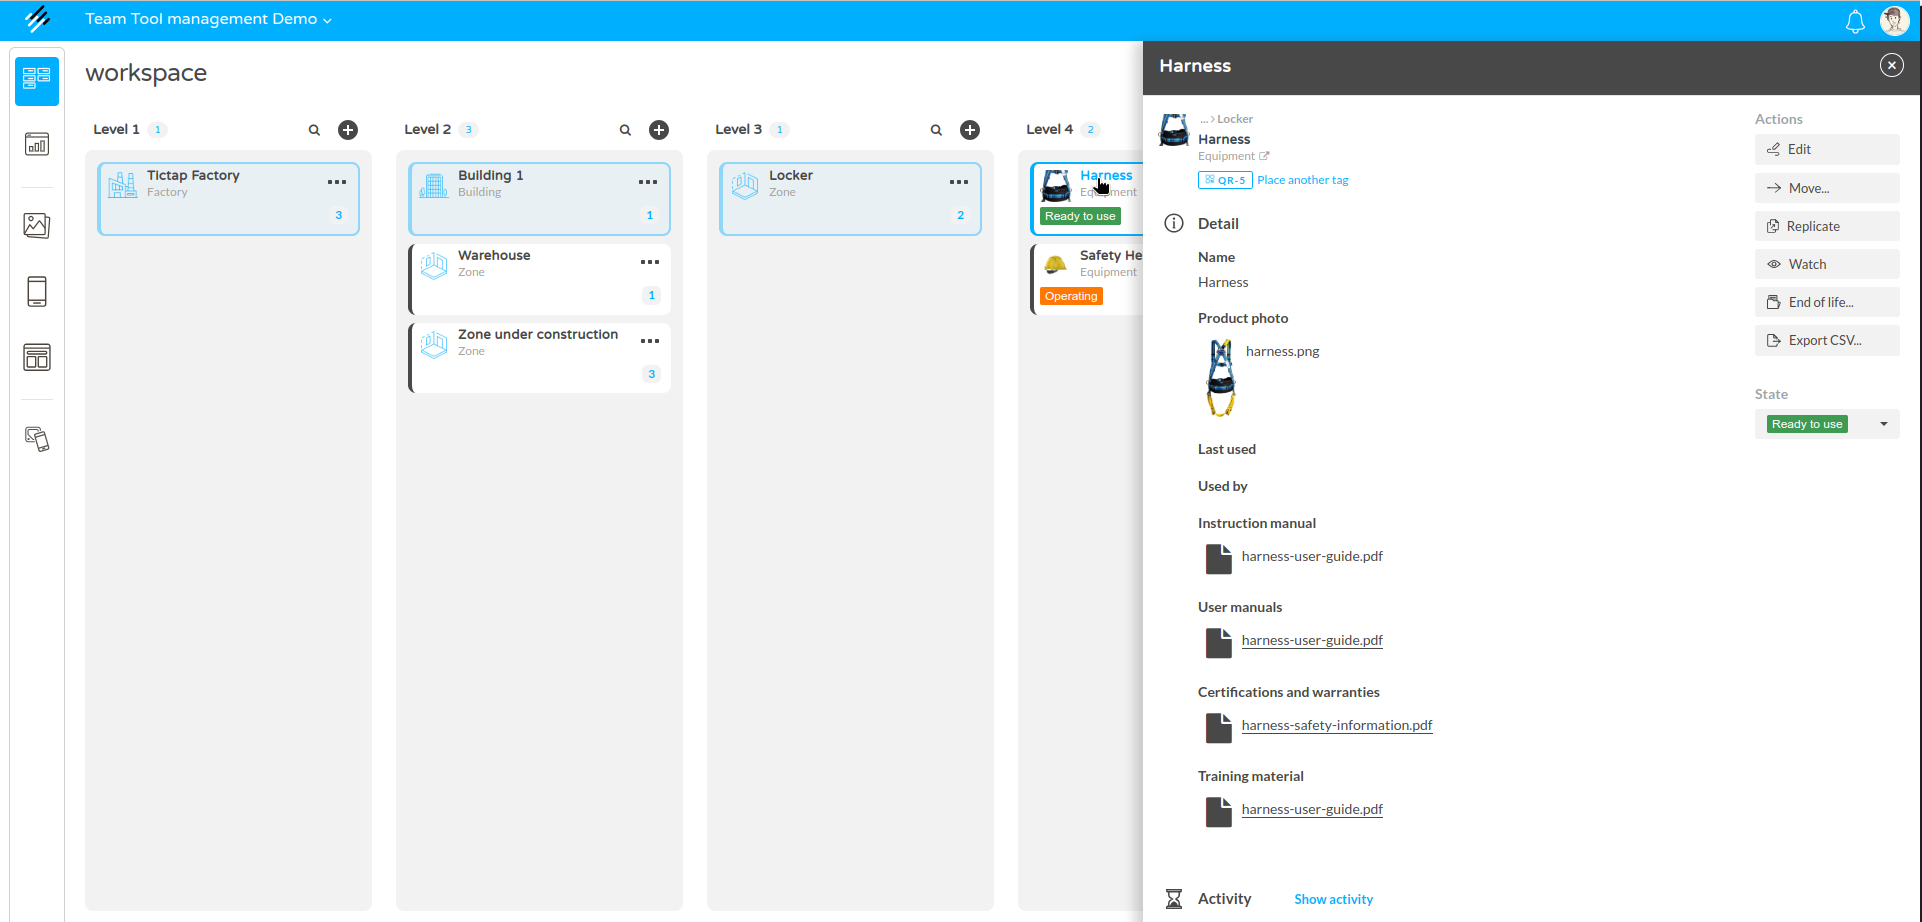
Based on the customization to your Enterprise, your asset will show a set of fields . If you want to know more about the asset details and how to interact with the asset, you can learn more in the Asset guide
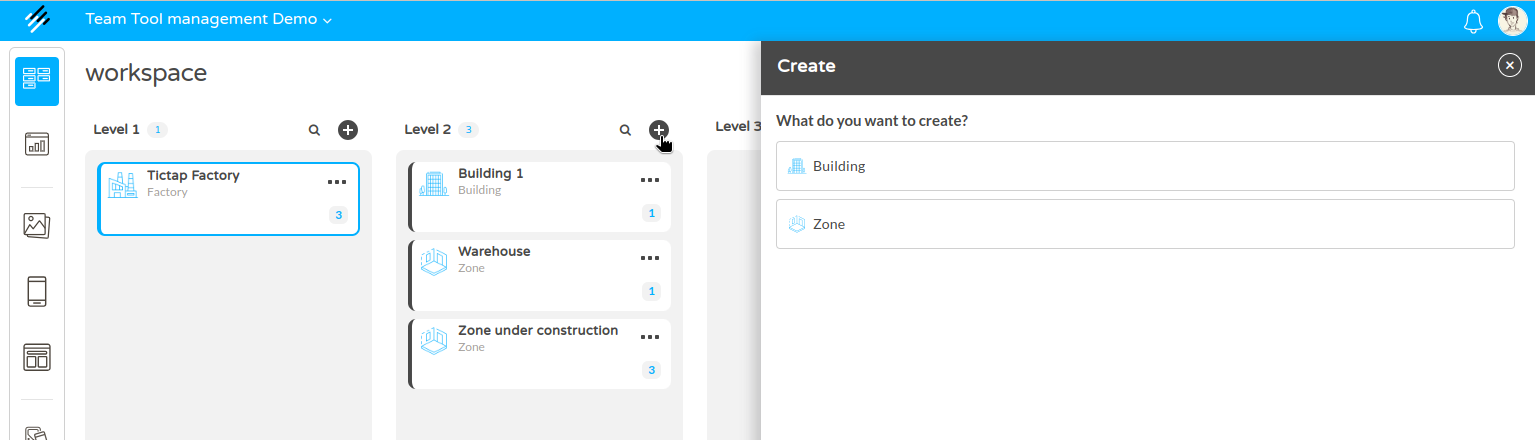
Quick Add Functionality
In each level, users can easily add new locations, assets, or categories by selecting the + (plus) icon. This allows for quick expansion of the workspace as needed.
Search Functionality
The search feature in the TicTAP workspace allows you to quickly locate assets based on name, reference, or other criteria. This powerful tool is designed to streamline navigation and improve efficiency when managing large sets of assets.
-
Search Box: Located at the top of the workspace, the search input allows you to find assets by entering their name or reference. Simply start typing in the search field, and the system will filter the assets in real-time.
-
Filter Options: The advanced filter panel (accessible via the filter icon) offers additional customization, allowing you to refine your search based on various criteria:
- Search In: Select the asset type or component type you want to search within (e.g., Equipment).
- State Filters: Filter assets by their current status, such as: Ready to use (Green), Operating (Orange), Out of service (Red) . These states can be defined per asset type in the Workflows guide
-
Advanced Search: By adding more filters, you can narrow your search further by specifying additional attributes like custom fields or asset conditions.
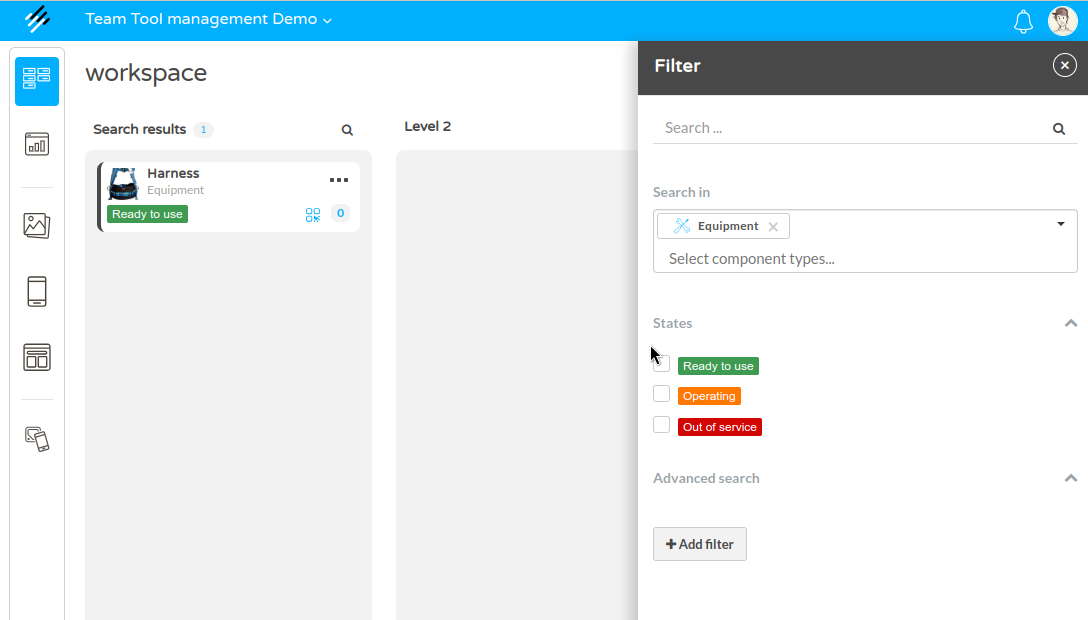
This combination of basic and advanced search features makes it easy to quickly find the specific asset you're looking for, saving time and ensuring effective management.
Reminders and Activity
- Reminders: A dedicated section for reminders related to the asset, such as restocking alerts or maintenance schedules. For instance, one reminder is active in the example.
- Activity Log: At the bottom of the asset details panel, users can access the full activity log by selecting Show activity, which tracks updates, changes, and interactions with the asset.
Asset guide
In TicTAP, assets are tied to detailed information and actions that allow for efficient management, tracking, and organization. This guide walks through the various actions you can perform on an asset, along with additional features like planning, reminders, and activity logs.
Asset Details Overview
When you click on an asset in the Workspace, the Asset Details panel opens on the right-hand side. This panel contains critical information and available actions. Key elements include:
- Name: The asset’s name (e.g., CO2 Fire Extinguisher 5Kg or Harness).
- Serial: The unique serial number or identifier for the asset.
- Product Photo: An image of the asset (if available).
- Documentation: Downloadable files related to the asset, such as:
- Instruction manuals
- User manuals
- Certifications and warranties
- Training materials
These fields help you quickly understand the asset’s purpose and current status, with easy access to the necessary documentation.
Actions You Can Perform on an Asset
Each asset has several available actions that can be performed to update, manage, or interact with the asset. These actions are displayed on the right-hand side of the asset details panel.
1. Edit
![]()
Click the Edit button to modify the asset’s details. In this mode, you can:
- Change the asset’s name.
- Update the product photo.
- Edit documentation (e.g., manuals, certifications).
- Adjust the serial number or other custom fields.
2. Move
![]() The Move option allows you to relocate the asset within the workspace hierarchy. For example, if an asset is moved from one zone or building to another, you can update its location in real-time by selecting the appropriate level and location.
The Move option allows you to relocate the asset within the workspace hierarchy. For example, if an asset is moved from one zone or building to another, you can update its location in real-time by selecting the appropriate level and location.
3. Replicate
![]() Use the Replicate button to create a copy of the asset. The replicated asset will inherit all of the original asset’s information, allowing you to easily create multiple instances with similar details.
Use the Replicate button to create a copy of the asset. The replicated asset will inherit all of the original asset’s information, allowing you to easily create multiple instances with similar details.
4. Watch (Following an Asset)
![]() By selecting Watch, you can subscribe to notifications about any changes or key actions related to the asset. Once you are watching (following) an asset, you will receive updates for important events, both on the platform and (optionally) via email, depending on your notification settings.
By selecting Watch, you can subscribe to notifications about any changes or key actions related to the asset. Once you are watching (following) an asset, you will receive updates for important events, both on the platform and (optionally) via email, depending on your notification settings.
What You Get Notified About:
- Reminders: You’ll receive a notification when a reminder is about to expire or has expired for the asset.
- Form Submissions: Any time a form related to the asset is submitted, you’ll be notified.
- Other Key Actions: Changes to the asset’s state, documentation updates, or any major actions performed on the asset will trigger a notification.
This ensures that you stay informed about the status and updates to critical assets, without having to manually check them. Notifications will appear directly in the platform, and, if enabled, an email alert will also be sent to notify you of the event.
5. End of Life
![]() Click End of life to mark the asset as no longer in use. Once an asset reaches the end of its lifecycle, it can be archived for reference, but it will no longer be part of the active asset pool.
Click End of life to mark the asset as no longer in use. Once an asset reaches the end of its lifecycle, it can be archived for reference, but it will no longer be part of the active asset pool.
6. Export CSV
![]() You can export all the data related to the asset into a CSV file. This is helpful for external reporting, auditing, or sharing asset information with stakeholders.
You can export all the data related to the asset into a CSV file. This is helpful for external reporting, auditing, or sharing asset information with stakeholders.
7. PDF Report
![]() The PDF Report option allows you to generate a detailed PDF document summarizing all asset-related information, including details, documentation, and activity logs. This is useful for creating formal reports for maintenance, audits, or compliance purposes.
The PDF Report option allows you to generate a detailed PDF document summarizing all asset-related information, including details, documentation, and activity logs. This is useful for creating formal reports for maintenance, audits, or compliance purposes.
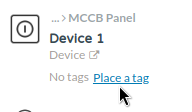
8. Place a tag / Place another tag
You can assign on or more tags to the asset by selecting Place a tag / Place another tag. This enables you to link multiple QR or NFC tags to the same asset, providing flexibility in how users interact with it.
9. Planning and reminders
TicTAP allows you to assign Plannings and Reminders to assets, making it easier to manage routine tasks, maintenance schedules, and inspections. You can learn more about this feature in the Planning and Reminders.
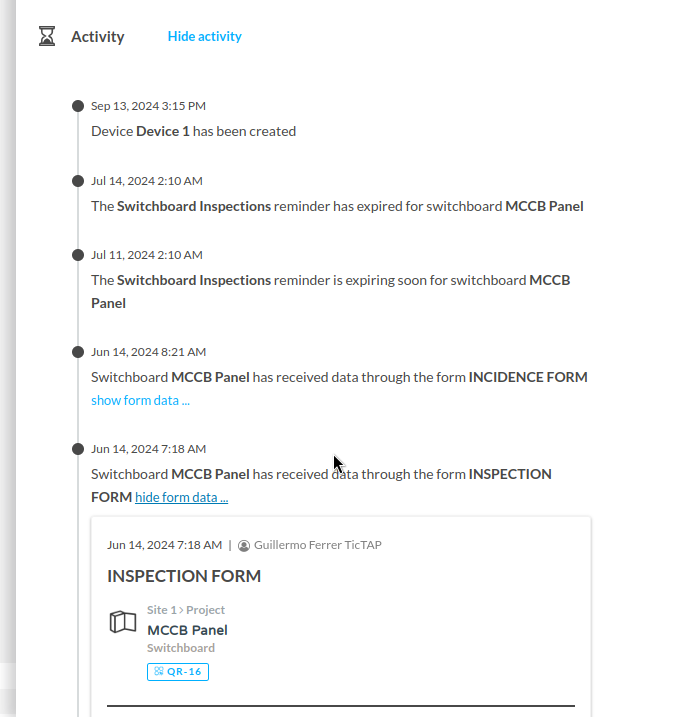
Activity Log
The Activity section at the bottom of the asset details panel provides a complete history of all actions taken on the asset. Click Show activity to view the full log, which includes:
- Changes made to the asset details.
- Status updates (e.g., from Ready to use to Out of service).
- Notifications of asset movements or document uploads.
Monitoring the activity log helps track the lifecycle of the asset, ensuring transparency and accountability for all interactions.
Asset State Management
In the asset details panel, you can manage the State of the asset from the dropdown menu, which typically includes options such as:
- Ready to use: The asset is operational and available.
- Operating: The asset is currently in use.
- Out of service: The asset is not functional due to maintenance or failure.
Keeping the asset’s state updated ensures that the rest of the team can easily determine its current condition, and it allows for better workflow management across the workspace.
Conclusion
Managing assets in TicTAP offers a comprehensive suite of tools for editing, tracking, planning, and documenting your assets. Whether it's moving an asset between locations, generating reports, or monitoring its lifecycle through activity logs, the asset management system ensures efficient and transparent control of your resources. By taking advantage of the actions, states, and reminders, you can maintain organized and well-managed asset data throughout your organization.
Asset Hierarchy
In TicTAP, information is not organised linearly but hierarchically. For data to be displayed correctly in the Workspace, it is essential to understand the relationship between the primary asset types.
Asset Types
Before creating any entries, we must distinguish what is being registered:
- Asset Container: An entity that groups assets together (e.g. a plant, a building, or a van containing tools).
- Asset: The final item (e.g. a water pump, a fire extinguisher, a vehicle, or a machine). This is the object subject to maintenance or inspection.
How to relate Assets to one another
Relationships are established through a hierarchy of location and belonging:
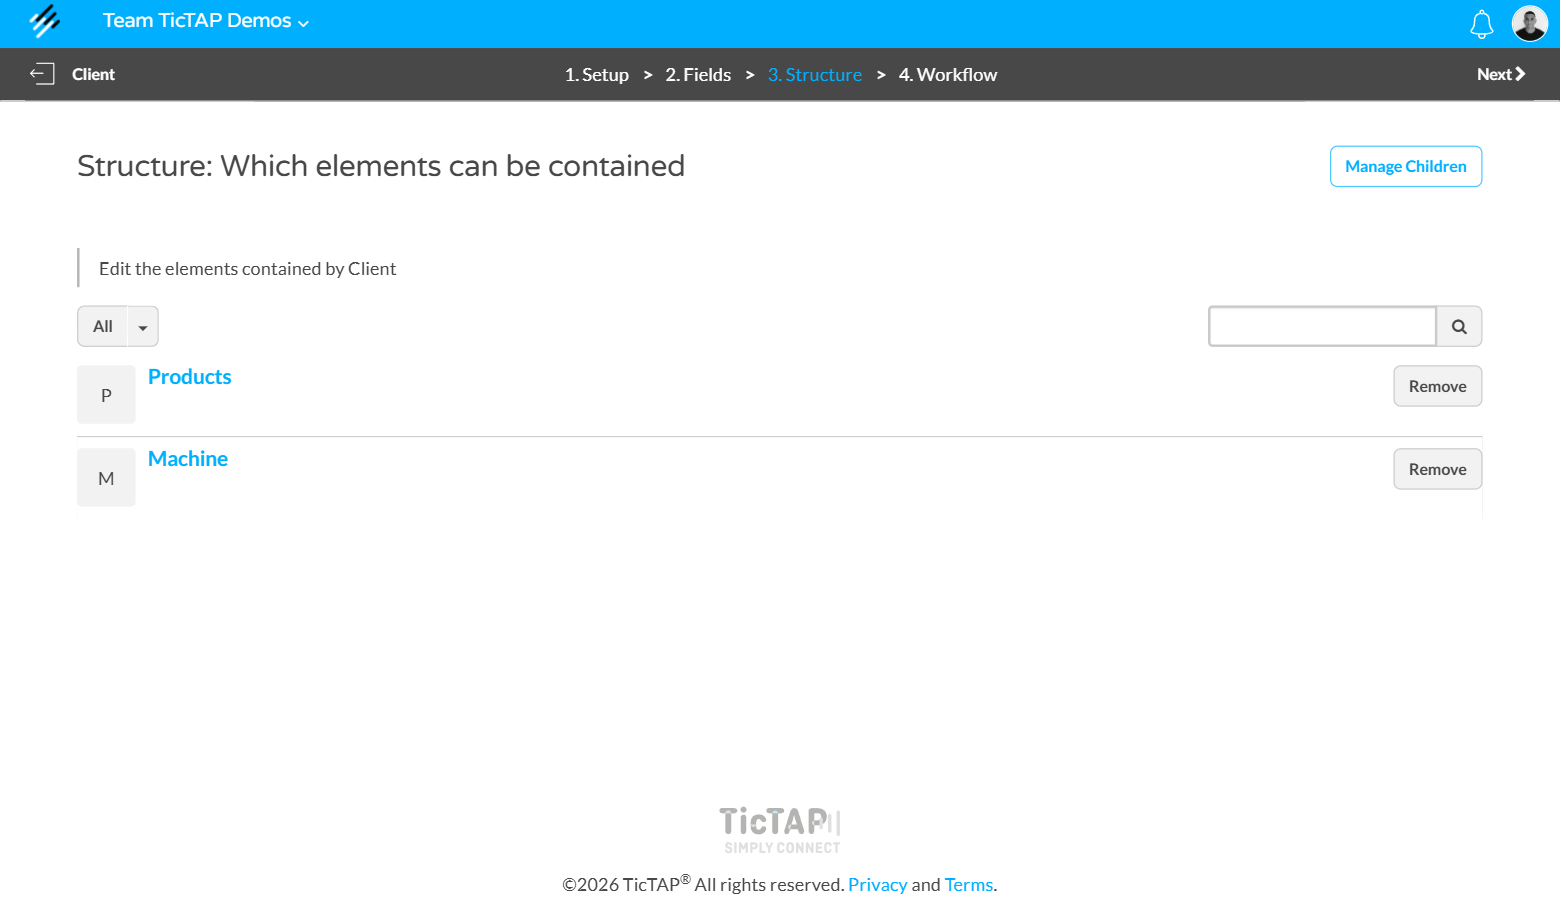
- Parent-Child Relationship (Containers): In TicTAP, you can build a tree hierarchy to organise your assets. When configuring an asset that will function as a container, you can define its "Children". Upon selecting an asset as a child, it will automatically be nested within its corresponding asset container.
Example: "Client" Container > "Products" and "Machine" Children.
- Asset Multi-dependency: In TicTAP, the structure is flexible: a single Asset can be a "child" of several Asset Containers simultaneously.
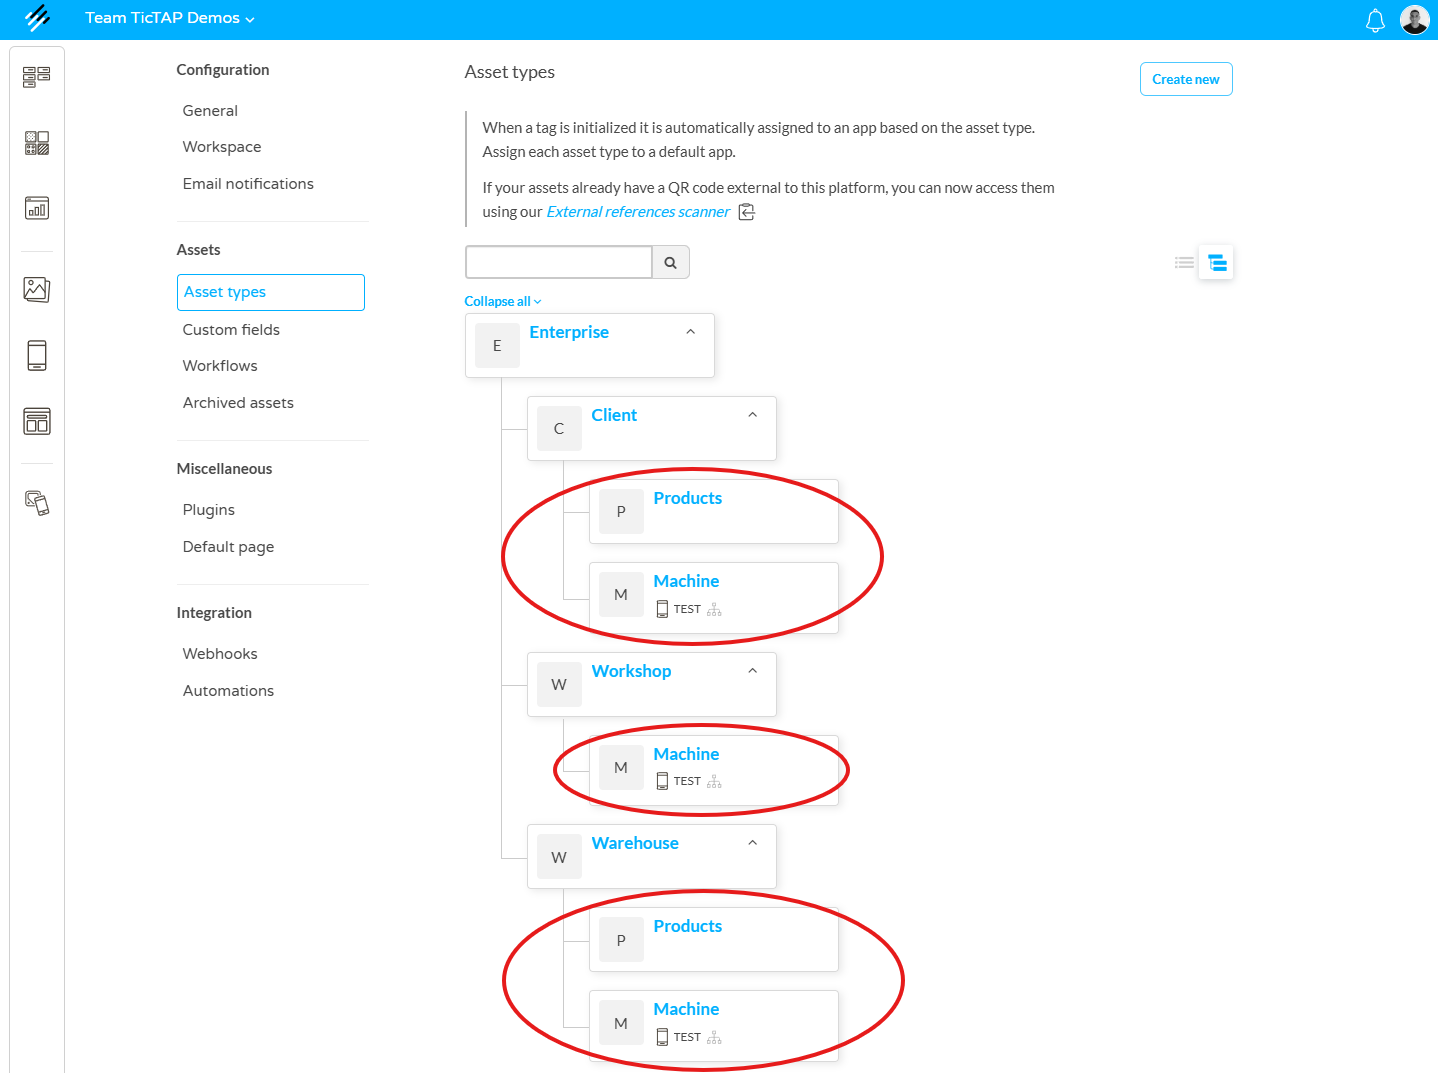
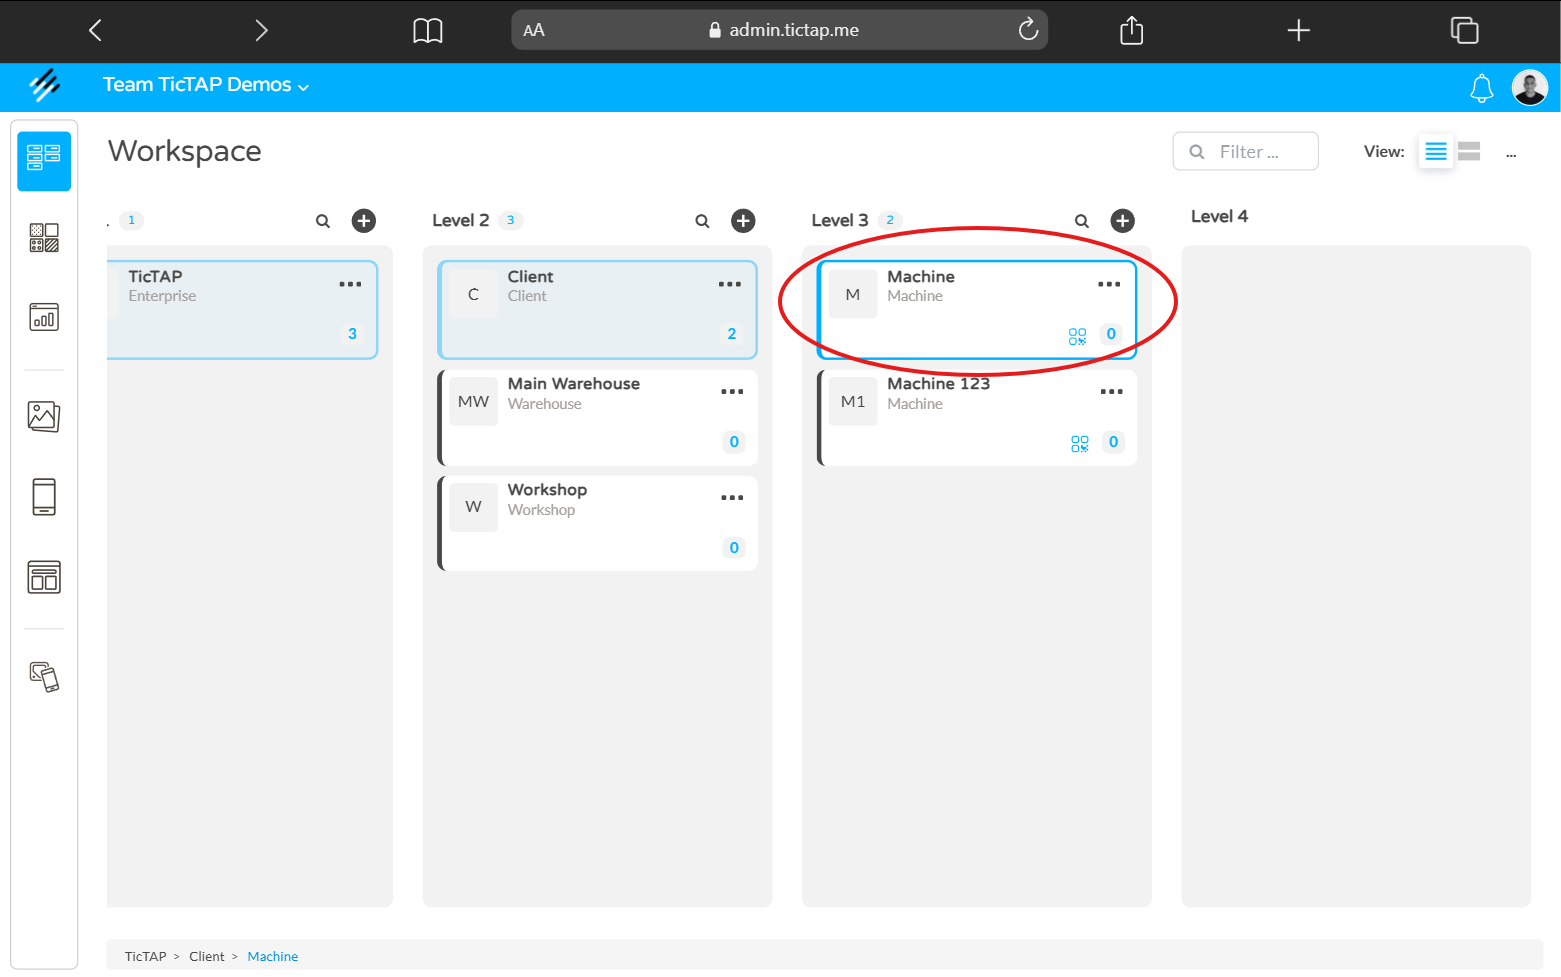
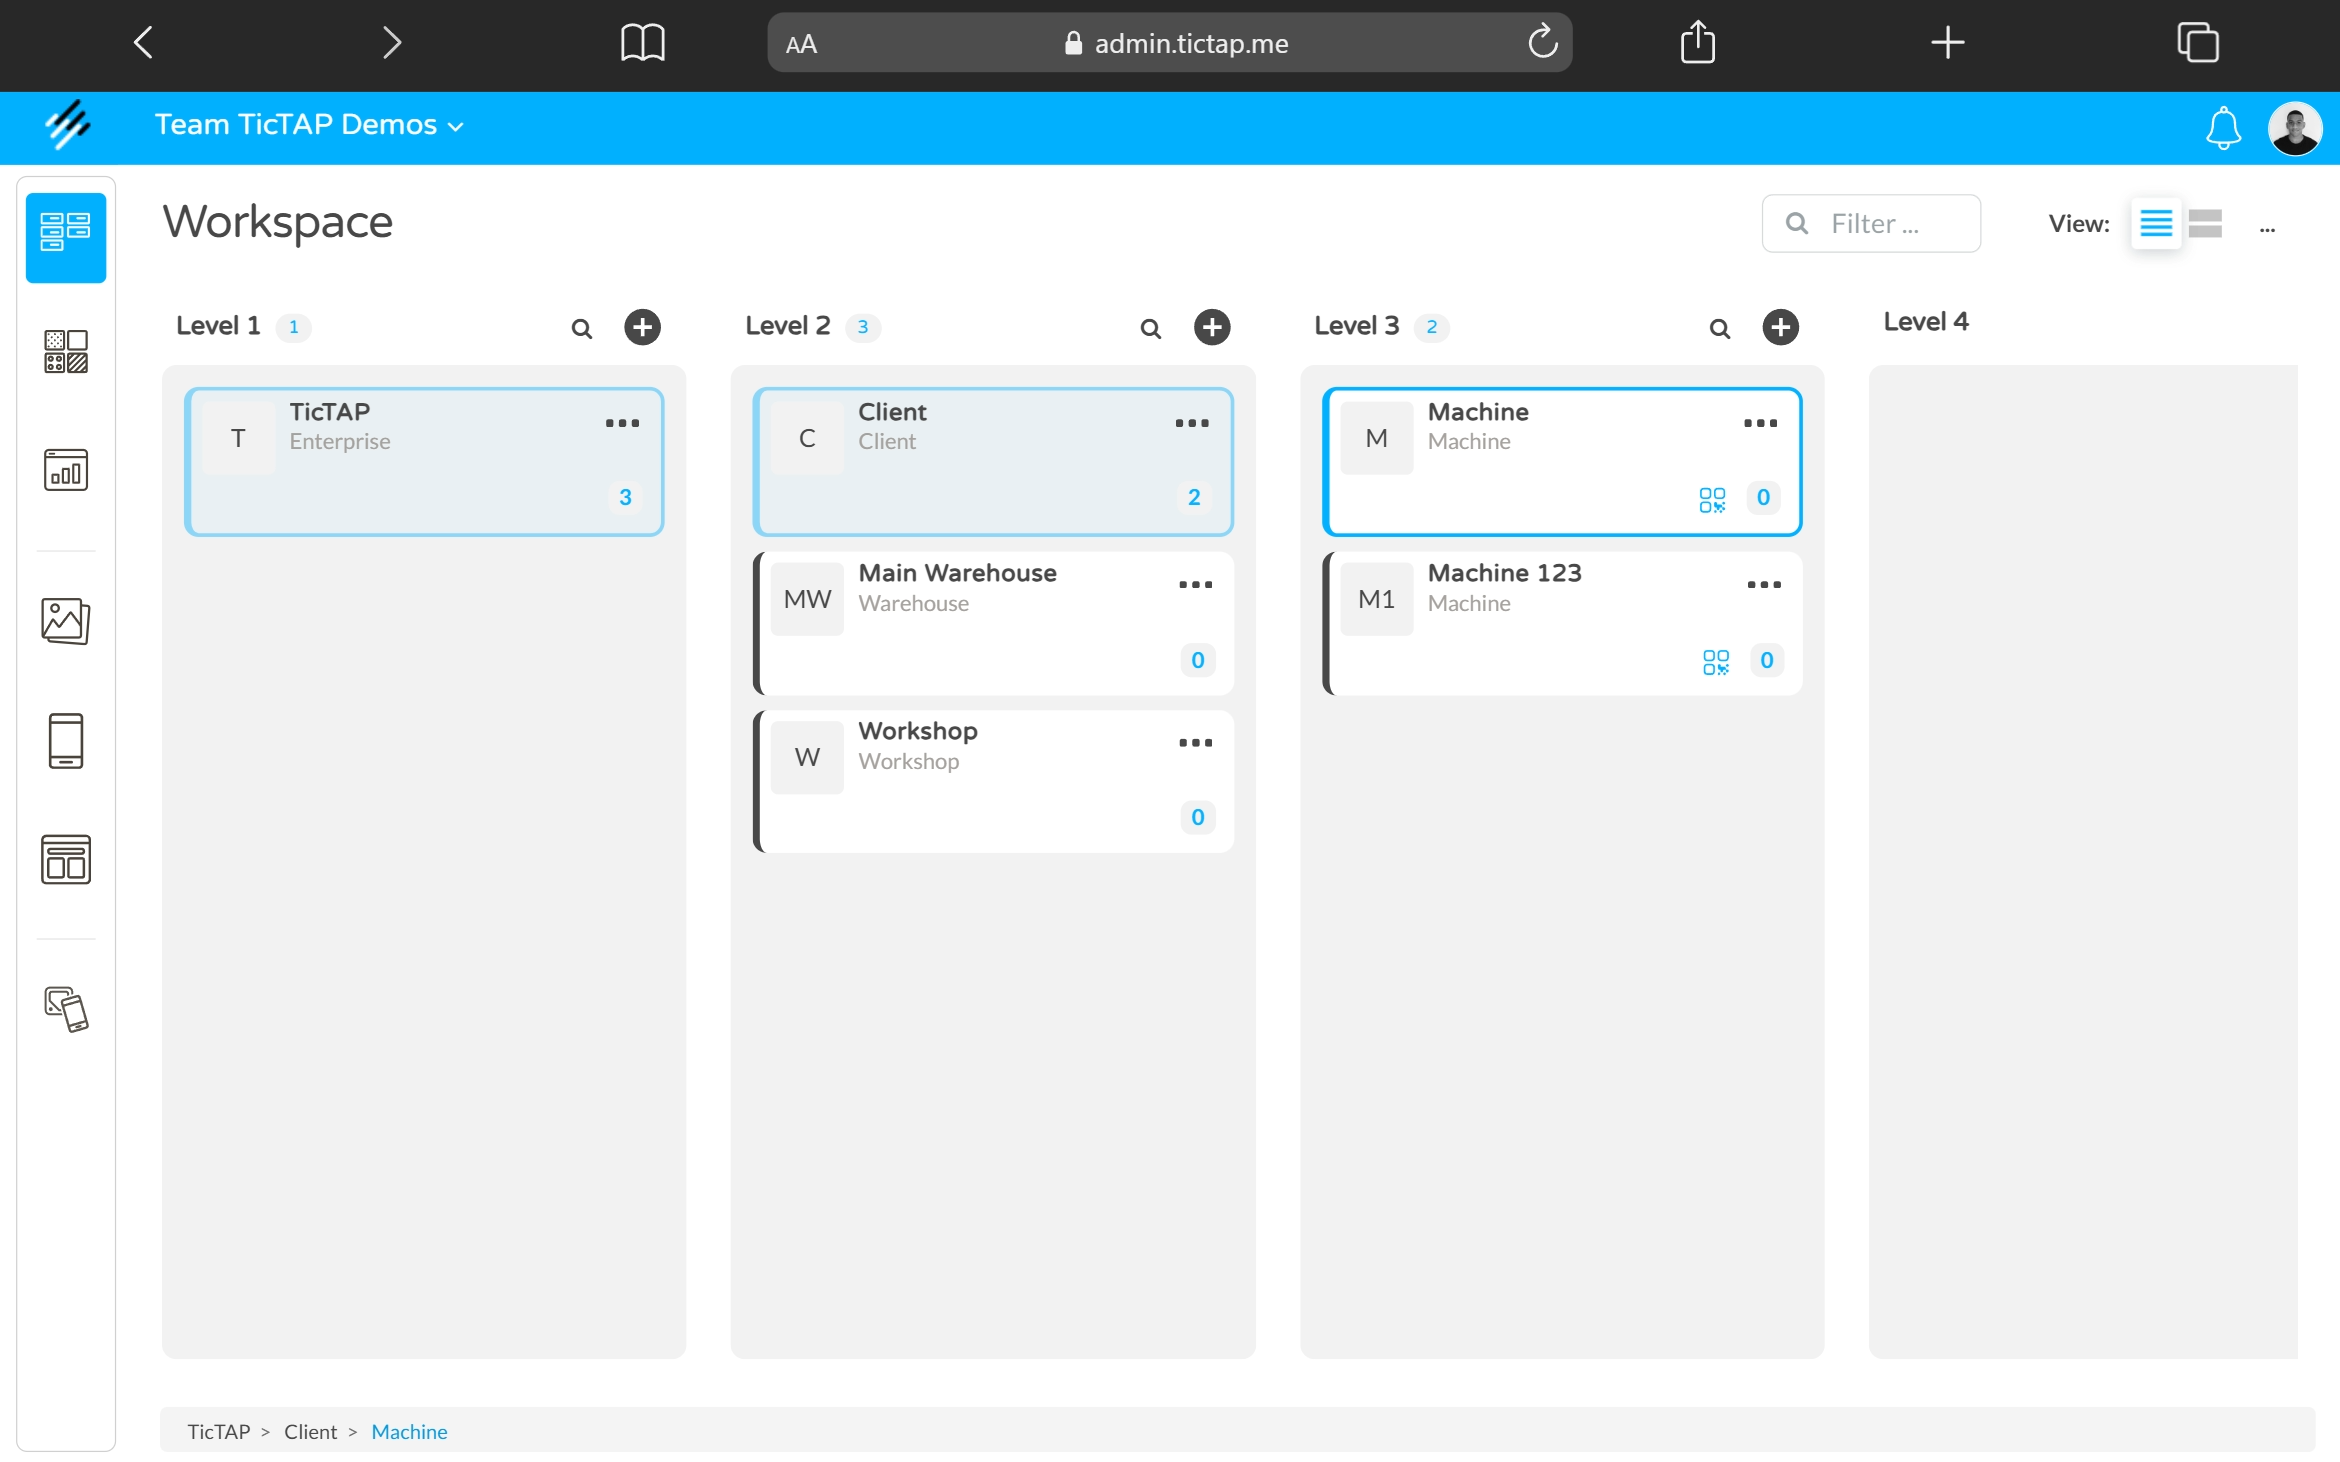
Workspace Visualisation
The Workspace is the central interface where the entire structure mentioned above is reflected. To ensure effective visualisation:
- Tree View: In the side panel of the Workspace, you will see the container hierarchy. By clicking on a container, all related assets will be displayed.
Useful Links
If you wish to delve deeper into asset management and platform configuration, we recommend consulting the following resources:
Planning and reminders
TicTAP allows you to assign Plannings and Reminders to assets, making it easier to manage routine tasks, maintenance schedules, and inspections.
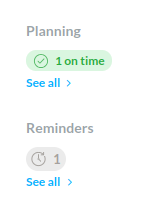
Planning
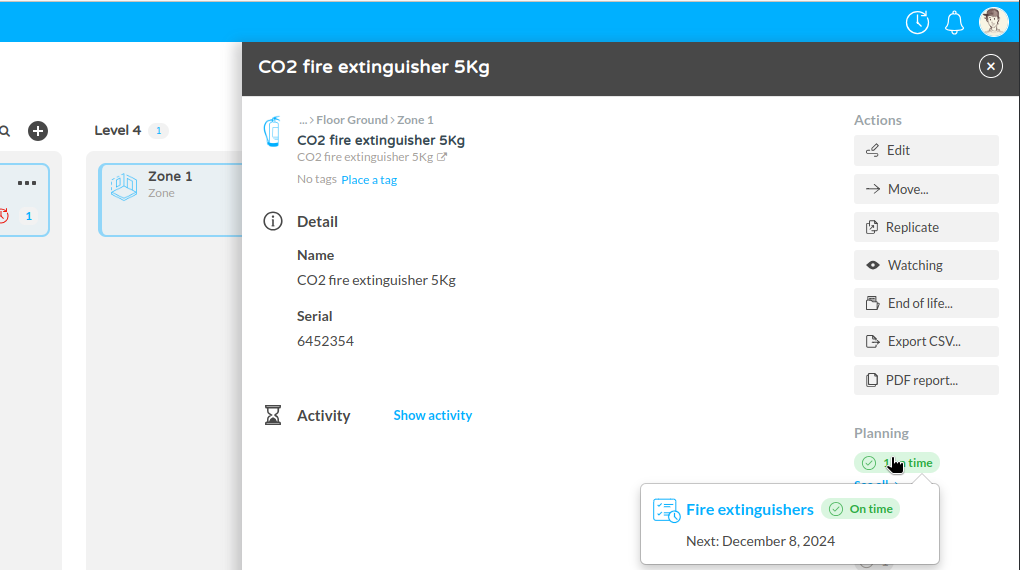
- Planning Status: Displays the current planning status, such as whether scheduled tasks are on time. In the screenshot, you can see "1 on time" under Planning, which indicates that a scheduled task has been completed as planned.
- Click See all to view details of the tasks or maintenance actions linked to the asset, such as inspections or service dates.
Reminders
- Reminders: This section displays active reminders for the asset (e.g., maintenance due dates or routine check-ups). In the example, there is "1 Reminder" under the Reminders section.
- Click See all to view a list of reminders, which helps ensure tasks are completed on schedule and assets are properly maintained.

Customize
This chapter explains how to customize and work with the specific adjustments for your assets
Asset configuration
Primarily, there are three types of dynamic entities: assets, asset containers and categories.
Assets
The main characteristic of an asset is that a tag can be attached to it. When configuring a dynamic entity as an asset, the application that serves that type of asset must be specified. This way, when a tag is attached to an asset, this tag will automatically move to the application that manages this type of asset, and when visiting the tag, the configured templates for that application will be displayed.
Asset Containers
Asset containers are dynamic entities that allow containing assets within them. For example, a building is an asset container. Inside a building, we can find the assets directly, but we could also find other sub-asset containers. For example, a building can have floors, a floor can have zones, and a zone can have assets.
An asset container can, in turn, be an asset. That is, a tag can be attached to an asset container. The main benefit of attaching a tag to an asset container is to assign an application that allows the user visiting the tag to understand the location of the asset and navigate among the asset park within the container.
Categories
A category is defined by a name and a series of custom fields. Typically, categories are used to expand asset information and define a common space to store information shared among multiple assets. Examples of categories could be model, range, delegation, brand, etc. All of them can contain common information for the assets classified under these categories.
Custom fields
Tags and assets store information through dynamic fields. Dynamic fields are a way to customize what information you want to store within a tag, asset, or even an app. For example, you can create a media type field that stores a PDF file corresponding to an asset's user manual.
There are different types of fields: text field, email field, date field, options field, file field (which can be an image or a file), image gallery (which allows storing many files), address field (which allows storing an address), and relationship field.
Relationship Field
The relationship field type is a special field that allows linking the asset or tag in which it is used with a category. For example, a fire extinguisher can have a relationship field linking it to a fire extinguisher model. This way, common information for all fire extinguishers can be stored within the related model, avoiding repeating the same information for each fire extinguisher.
An asset or tag or app can have many relationship field types. For example, a generator can have a range, and this range is related to a model, and the model is related to an engine. In this way, the generator is related to its engine through the range and its model.
Numeric Field
Numeric fields allow entering only decimal numbers. Thus, if an asset has a numeric field, this field only allows storing a decimal number. If it is not a number, it will be considered invalid data.
Workflows
Workflows in TicTAP allow you to define the different states that an asset can go through during its lifecycle. You can create custom workflows for each asset type, which helps track their status and manage transitions between states, such as from "Ready to use" to "Operating" or "Out of service."
Managing Workflows
In the Workflows section, which can be accessed via the Settings tab, you have the ability to view, create, and edit workflows. Each workflow defines a set of states and transitions, allowing you to manage the progression of assets as they move through their operational stages.

In the image, we see the Workflows section in the application's settings menu:
- You can manage workflows under Assets > Workflows.
- To create a new workflow, click on the Create new button.
- Existing workflows, such as the "Tool Workflow," are listed. For each workflow, you can see the asset types it is applied to (e.g., Equipment, Tool, Vehicle).
- Use the search bar to quickly find specific workflows by name.
- To modify an existing workflow, click the Edit button next to the workflow name.
Workflow States and Transitions
It is possible to edit the different states and transitions between them by editing a worflow. In the following figure, we can see a detailed view of the Tool workflow, showing the different states that assets can occupy, as well as the transitions between those states:
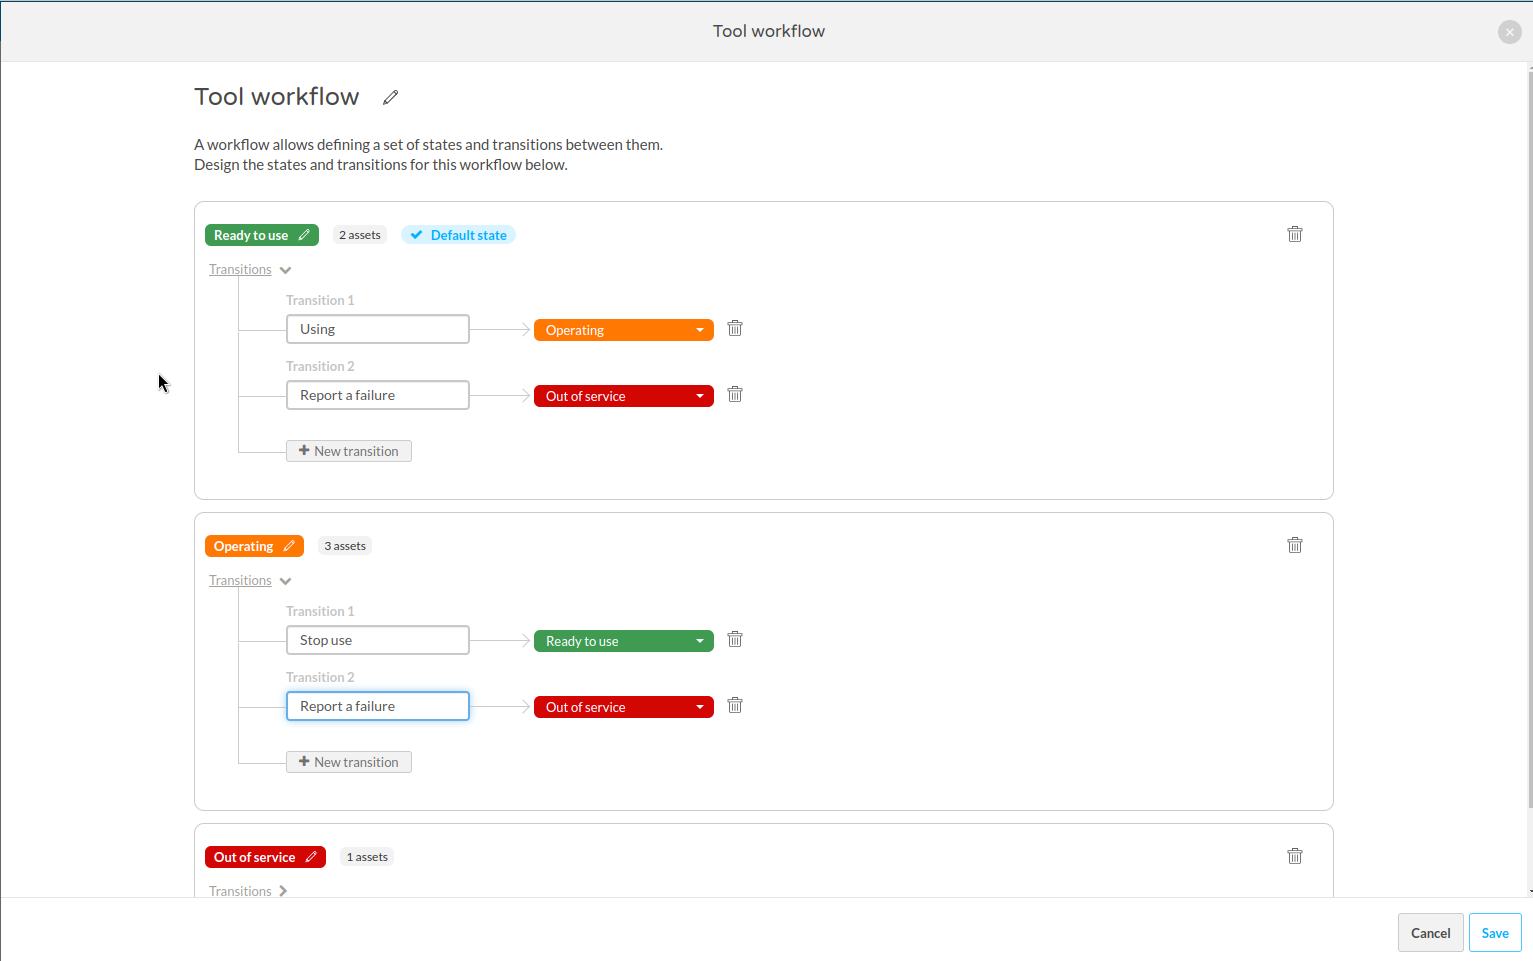
- States: Each state is color-coded for easy identification, such as Ready to use (green), Operating (orange), and Out of service (red).
- Transitions: These represent the possible changes in the asset’s state. For example:
- An asset can transition from Ready to use to Operating by selecting a transition like "Using."
- Similarly, from Operating, an asset can transition back to Ready to use or move to Out of service when a failure is reported.
- You can create additional transitions by clicking + New transition within any state.
- The default state (where assets start) is marked with a blue "Default state" label. In this case, assets begin in the Ready to use state.
Customizing Workflows
- Adding New States or Transitions: You can add custom states and define how an asset moves between them by creating transitions. This allows for flexible management of different types of assets.
- Default State: The default state is the initial state that an asset is assigned when it’s first added to the system.
- Managing Assets: The number of assets in each state is displayed beside the state name (e.g., 2 assets in Ready to use, 3 in Operating).
Once you’re satisfied with the states and transitions, click Save to finalize your workflow. This workflow will now apply to any assets of the defined types, such as tools, equipment, or vehicles, and users can easily update an asset’s state based on real-time conditions.
If you want to know how to apply these worflows to the different asset types, you can check the Asset configuration guide
Maintenance plans
A maintenance plan allows configuring a series of scheduled tasks for one or several types of assets. For example, an annual maintenance plan for CO2 extinguishers. The maintenance plan requires filling out a form periodically, and if it is not done on time, an expired task appears, informing that the plan is not being fulfilled properly.
Maintenance plans generate a series of future tasks, and all these tasks are grouped into an agenda.
In TicTAP, any asset container can display the agenda related to all the assets it contains. For example, in a building, you can see all the scheduled tasks of all the assets in that building. If the building has floors, you can visit the agenda of each of the floors separately.
In addition, TicTAP shows the global agenda of the team, where you can see all the scheduled tasks for any of the locations/asset containers existing on the platform.
Starting the Plan
Despite having configured a maintenance plan, the assets affected by that plan will not have the schedule activated until it is started for the first time. To start a plan on an asset, it is simply necessary to submit the form linked to the maintenance plan. For example, in a quarterly inspection plan for a fire extinguisher, the first time the inspection form is submitted, the quarterly maintenance plan begins.
When a maintenance plan starts for an asset, a reminder will be created that will expire some time after the last maintenance carried out.
Types of Plans
According to the maintenance plan configuration, there are two types of plans: series plans and natural plans.
Series plans cause the expiration date of the next maintenance to always be a fixed period of time since the last maintenance was done. For example, if the last maintenance was done on January 1st and the plan defines an annual period, the next maintenance will be on January 1st of the following year.
Natural plans make the expiration date of the next maintenance be at the end of the configured period, regardless of when the last maintenance was done. For example, if a task needs to be done once every quarter, the natural plan will set the expiration date at the end of each quarter. When the maintenance is carried out within a quarter, the expiration date will be created at the end of the next quarter. Natural plans are used when it is important to ensure that the maintenance of an asset is done within a period of time regardless of the date within the period the plan is executed.
Ending the Plan
A maintenance plan ends when the asset reaches its end of life or when it is deleted. Additionally, the maintenance plan can also be paused. This is especially useful when, for some reason, the assets need to be removed, and it is not desired for the platform to continue sending maintenance alerts.
Stock management
TicTAP's Stock Management module now works with a product catalogue and store-based inventory. Products are defined once in the catalogue, then each store, warehouse, van, or other stock location keeps its own quantities, minimum and maximum levels, and stock value.
For the full workflow, see Stock management.
Current Stock Workflow
Stock is managed through two connected areas:
- Backend management: administrators maintain the product catalogue, review inventory by store, configure stock thresholds, check replenishment needs, subscribe users to stock events, and audit stock transactions.
- Stock application: store users scan the store QR code, choose an operation, add products to a basket, confirm quantities, and create a stock transaction.
The catalogue is the source for product data such as name, part number, description, image, category, manufacturer, and unit cost.
Product Catalogue
The catalogue centralizes the products that can be stocked. From the backend you can create and edit products, organize them by category, assign manufacturers, import products in bulk from CSV, and export the catalogue for external review.
The catalogue area includes dedicated views for products, categories, and manufacturers. Categories define the tree used later to group products below each store, while manufacturers keep supplier or brand data consistent across all stores.
Store Inventory
Each store has its own inventory based on the shared catalogue. To add catalogue products to a store, open the store in the Workspace and create a new product holding for that store. A product holding links one catalogue product to one store and defines the store-specific quantity, minimum stock, and maximum stock.
You can create product holdings one by one by selecting an existing catalogue product, or import them in bulk when preparing a store inventory. Once created, they appear under the store organized by the product categories defined in the catalogue. In the Inventory Summary you can review stocked products, categories, total units, total stock value, current quantity, minimum and maximum levels, unit cost, and product details.
Stock Operations
Users operate stock from the Stock Application. After accessing a store, they choose the operation type:
- Stock out: remove units from stock.
- Stock replenish: add units to stock.
- Stock adjust: set the recorded quantity to match the real count.
- Stock transfer: move units from one store to another.
Products can be selected by searching, browsing categories, or scanning a product QR code. Selected products go into a basket where quantities can be reviewed and edited before confirmation.
Replenishment, Notifications, and Transactions
When a product quantity in a store falls below its configured minimum, it appears in the Stock Replenishment view and TicTAP automatically creates a replenishment reminder for that product in that store. When the product is replenished back to the expected level, the reminder is resolved automatically. Users can subscribe to events such as depleted stock, replenished stock, and outgoing stock transactions.
Every confirmed stock operation creates a transaction that records the operation type, affected products, quantities, user, date, reason, notes, and order number when provided. Transfer transactions also record the source store and destination store.
Induction system and work certificate management
This document describes the process to manage the induction system for contractors. It explains how to use the contractor visit QR, insurance management, creation, authorization, and completion of work certificates.
1. Upload and management of contracts
All contractors' contracts who will work at the plant are uploaded to the system. Access and management are done through the Contractor Visit QR available at the plant.
2. Using the contractor visit QR
- The QR is scanned by an authorized person in the plant.
- The user can:
- Create a new contractor if it is a new person.
- Search for an existing contractor in the company list.
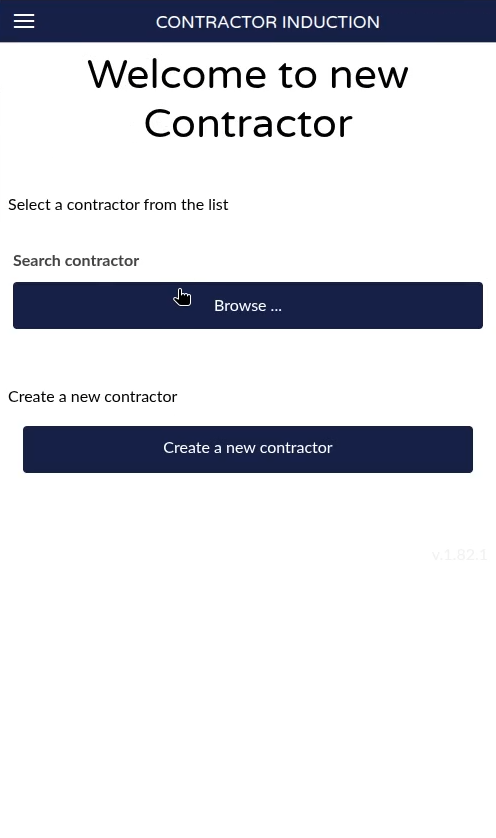
Screen showing the Contractor Visit QR at the plant.
3. Checking the contractor's insurance status
- When selecting a contractor, you can see their insurance status.
- For example, contractor Contractor 2 may appear as Not insured if their policy has expired, with the expiration date visible (e.g., June 16).
- Access is only allowed if the contractor is insured.
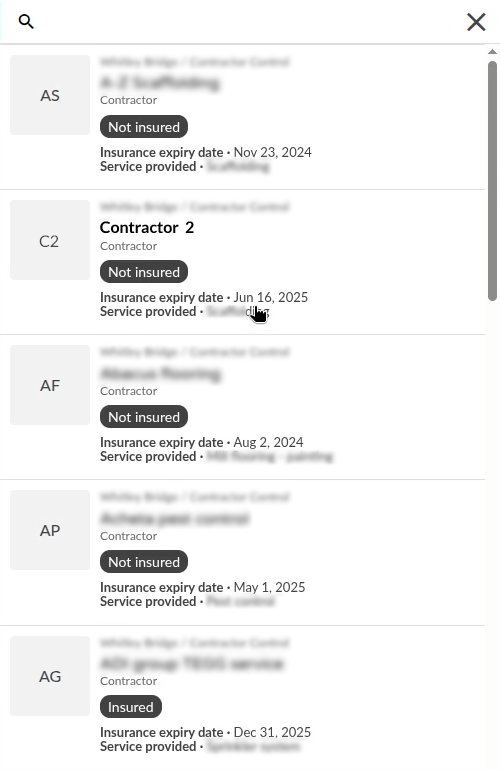
View of the contractor's insurance status.
- To update the insurance expiration date, manually change the date in the Workspace and refresh the screen so that the status changes to insured.
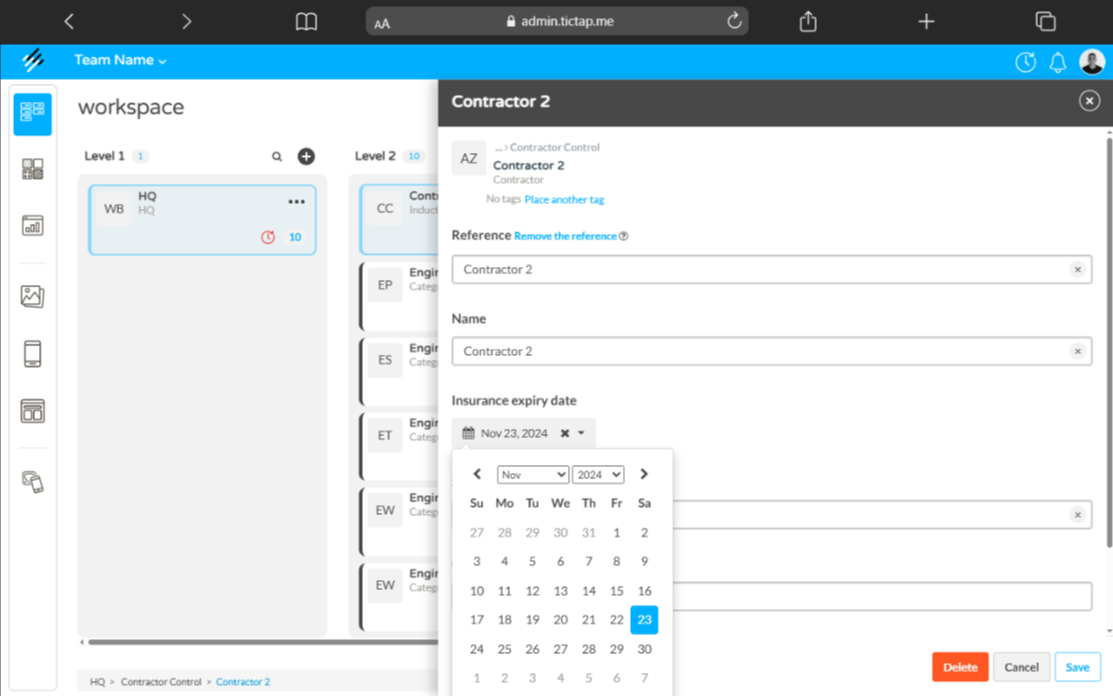
View of the update to the expiration date.
4. Contractor identification and creation of work certificates
- You can search for a contractor by name (for example, "Danny").
- Verify that the contractor is validated and insured.
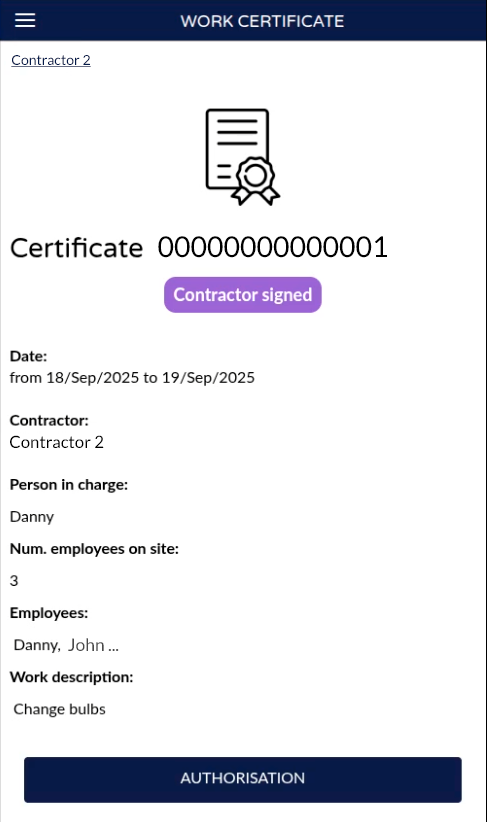
- Create a work certificate for the contractor:
- Fill out a form with data such as:
- Names of the people coming to work.
- Reason for the visit (e.g., changing bulbs).
- Duration of the visit (from today until tomorrow).
- The contractor signs and accepts the obligations by submitting the certificate.
- Fill out a form with data such as:

Form to enter data and sign the work certificate.
5. Authorization of the work certificate
- The certificate signed by the contractor must be authorized by a user with privileges (role:
work approval certificates). - The authorized person reviews the certificate and signs to validate its approval.
- Only with this authorization can the contractor enter to work.
Interface for the user with permissions to authorize the certificate signed by the contractor.
6. Completing and concluding the work
- The contractor must scan the QR again to complete the certificate when they have finished their work.
- The certificate can be:
- Completed by the contractor.
- Concluded by a responsible person if the contractor does not notify the completion.
- This closes the certificate and registers the completion date and corresponding signature.
7. Viewing and exporting certificates
- From the workspace you can review the history of each contractor's certificates.
- Each certificate shows:
- Contractor's signature.
- Start and authorization dates.
- Completion date and who finalized it.
- The certificate can be downloaded as a PDF or the complete information exported as Excel.
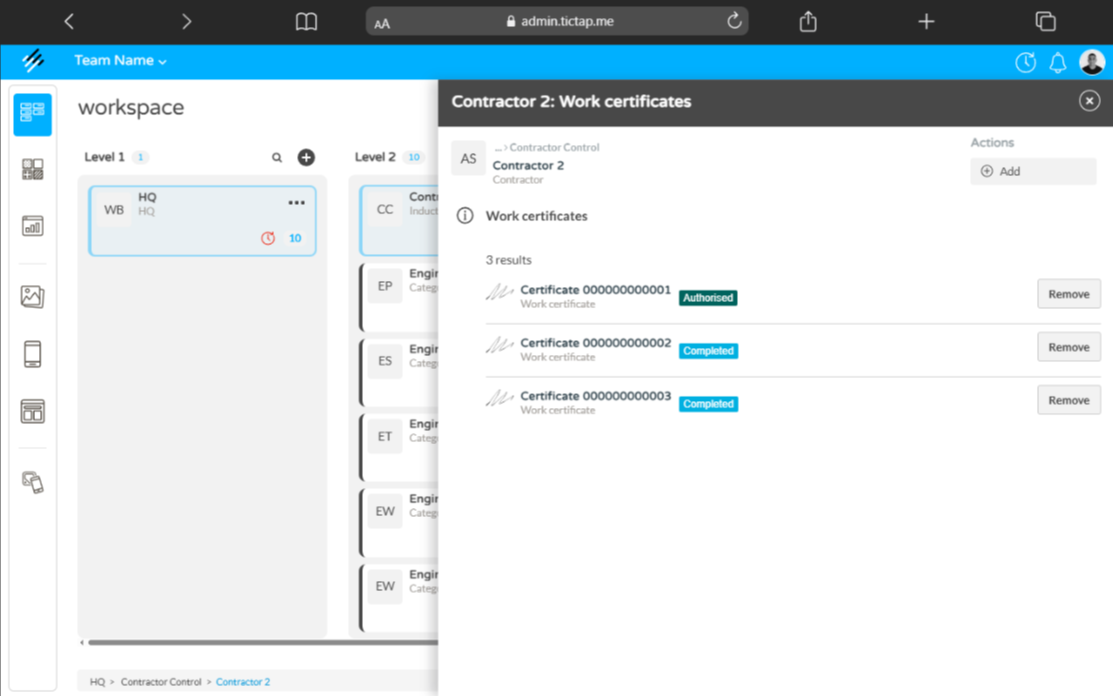
List and details of work certificates associated with a contractor.
Summary
The induction system at Whitworth Whitley Bridge operates through:
- QR scanning by authorized personnel.
- Control of the contractor's insurance status.
- Creation and signing of the work certificate.
- Authorization by personnel with permissions.
- Completion or conclusion of the certificate after the work is finished.
- Viewing and exporting reports.
This process guarantees safety and formal recording of the contractors' work at the plant.