Import data
How to Import data to the platform
Manually import with CSV file
In TicTAP you can manually import data from a CSV file. This is useful when you want to import data from a third party system or when you want to import data from a spreadsheet.
Import from the list
The first step to import data from a CSV file is navigate to the entity list of the definition you want to import data. For example, if you want to import data for the definition bie, you must navigate to the entity list of the definition bie:
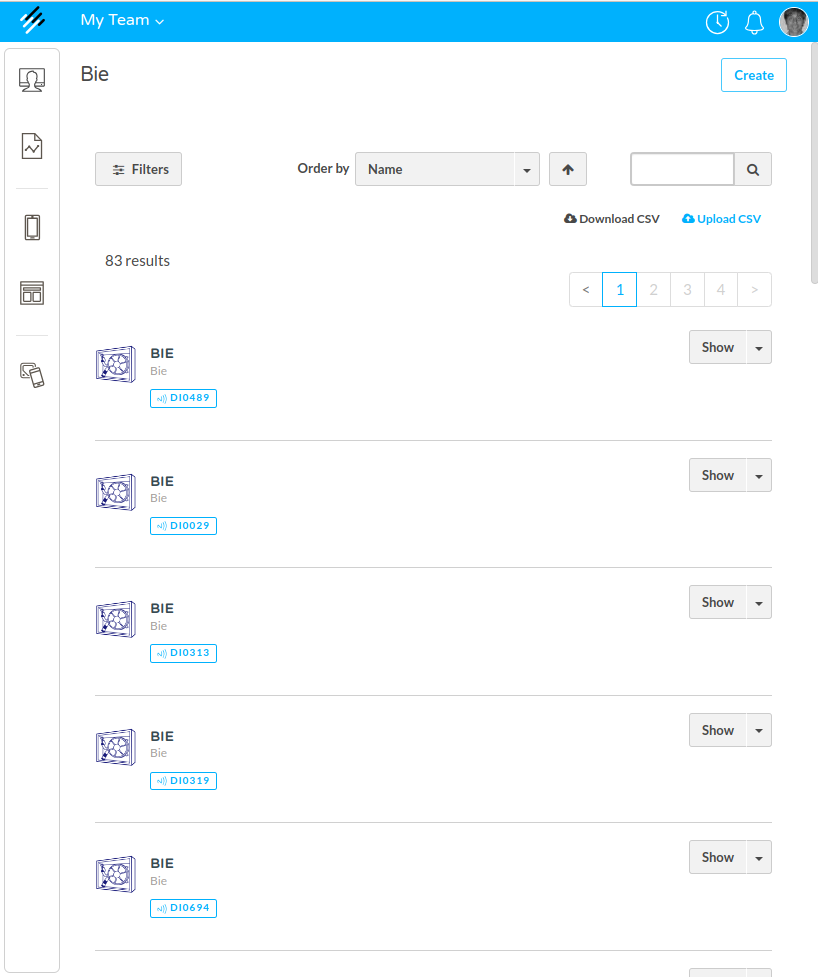
Once you are in the entity list, you must click on the import button:
![]()
When you click on this button you need to select a CSV file from your computer. The CSV file must have a header row with the names of the fields that you want to import.
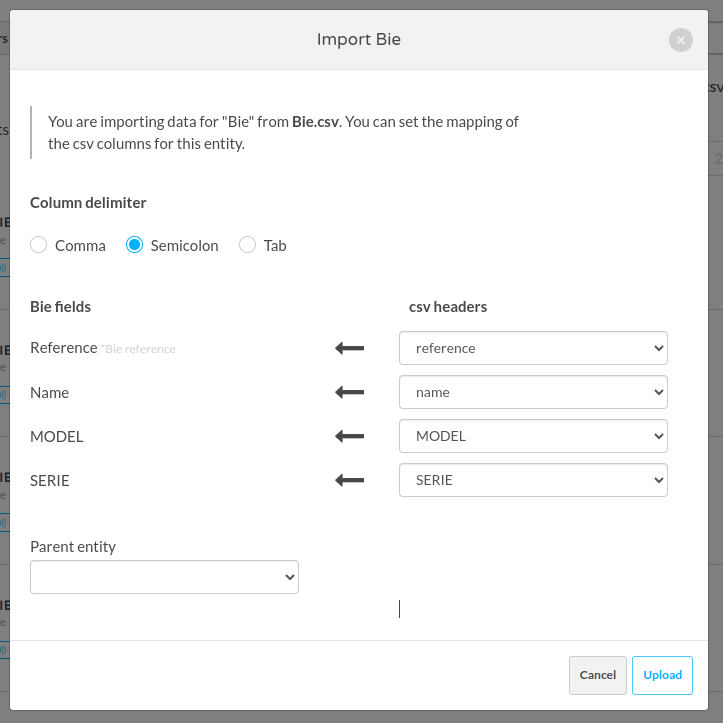
Map the fields
The system will automatically show a dialog where you can map every column of your CSV file to a field of the definition. If you don't map a column, the system will ignore that column.
Special fields
There are some special fields that you can map:
-
reference: This field is used to identify the entity. If you map this field, the system will try to find an entity with the same value in the fieldreference. If the system finds an entity with the same value, then the system will update that entity. If the system doesn't find an entity with the same value, then the system will create a new entity. -
parent entity: This field allows importing the list of entities as a tree. If you map this field, the system will try to find aparentfor each of the imported entities using the parentreference. If the system finds a parent entity with the same value in the fieldreference, then the system will set that entity as the parent of the imported entity. If the system doesn't find a parent entity with the same value, then the system will create a new entity without a parent. -
Media fields: some of the fields in the CSV can contain the name of a file. If you map a field that is a media field, the system will try to find a file with the same name in the media library. If the system finds a file with the same name, then the system will set that file as the value of the field. If the system doesn't find a file with the same name, then the system will give an import error.
Import CSV file with FTP
You can also import CSV files using SFTP: to do this, the TicTAP Team will create a folder in the FTP server ( sftp://ftp.tictap.me ) having an inbox and an outbox folder.
First of all, a known mapping configuration must be created by the TicTAP Team. This configuration allows the system knowing which column in your CSV maps to which definition field.
Using .lock
In order to let the system know that you have uploaded data to the inbox folder, a semaphore is being used in the following way:
- You need to upload a file named
.lock. This file is used to avoid the system processing the file while you are ready uploading. - Then you upload a file named
.csv. This file is the CSV file that you want to import. - If the
.csvfile has media fields, you need to upload the media files to theinbox/mediafolder too. Every media file must have the same name as the value of the media field in the CSV file. - Remove the
.lockfile.
When you remove the .lock file the system will start processing the .csv file and the media files. Firstly, it will upload every media file to the media library. Then it will import the CSV file.
Many CSV files
It is possible to upload several files related between them. For example, we could upload a list of bie entities and each of them having a relation to a model entity. In this case, we need to upload the CSV files in the following order:
- Upload the
.lockfile. - Upload the
.csvfile with thebieentities. - Upload the
.csvfile with themodelentities. - Upload the media files.
- Remove the
.lockfile.
Using the outbox folder
When the system finishes processing the CSV file, it will log the result in the outbox folder.
The result will be a file named {csv_file}.log with the same name as the CSV file that you uploaded. This file will contain the result of the import process. If the import process was successful, the file will contain the list of entities that were created or updated. If the import process failed, the file will contain the list of errors.
Besides, it is also possible to configure having certain output .csv files in the outboux folder under certain events. For instance, the system could create a .csv file every time an entity has been edited of marked as end of life , or when a new entity has been created and many other events supported, such as reminder_created , state_changed , submission_received...
In the integration phase, the TicTAP Team will create the right configuration to decide under which events the information needs to be created in the outbox folder.
Import workspace
The import feature in TicTAP allows you to add assets within a workspace by importing a structured hierarchy from a specific node and all its children (the entire descendant tree). It is also possible to import directly at the workspace root node (level 0).
Step 1: Export the Sample Structure
To understand the required structure for import, first export an example Excel file from an existing workspace. When opening the exported file, you can see:
- The hierarchy of nodes with their names.
- The level each node occupies (0 for location, 1 for category, 2 for articles).
- The asset type associated with each node (e.g., location, category, article).
Example structure in Excel:
| Level 0 | Level 1 | Level 2 | Type | Reference | State | Last Used | Photo Reference | Photo | Quantity | Supplier Reference |
|---|---|---|---|---|---|---|---|---|---|---|
| Calabria | Location | 123 | ||||||||
| Calabria | Material envíos TicTAP | Category | 1234 | |||||||
| Calabria | Material envíos TicTAP | Bolsas PE Autocierre 12x18 | Article | 12345 | ok | 87914 | bolsas.JPG | 49 |
 Import preview showing nodes and number of items per category
Step 2: Upload the File to Import
To start the import:
- Select the node within which you want to import assets (e.g., the root node "Calabria" or any child node at level 1).
- Use the option to import CSV or Excel file.
- Select the exported or compatible structure file.
When loading the file, a window appears to select the CSV/XLSX file.
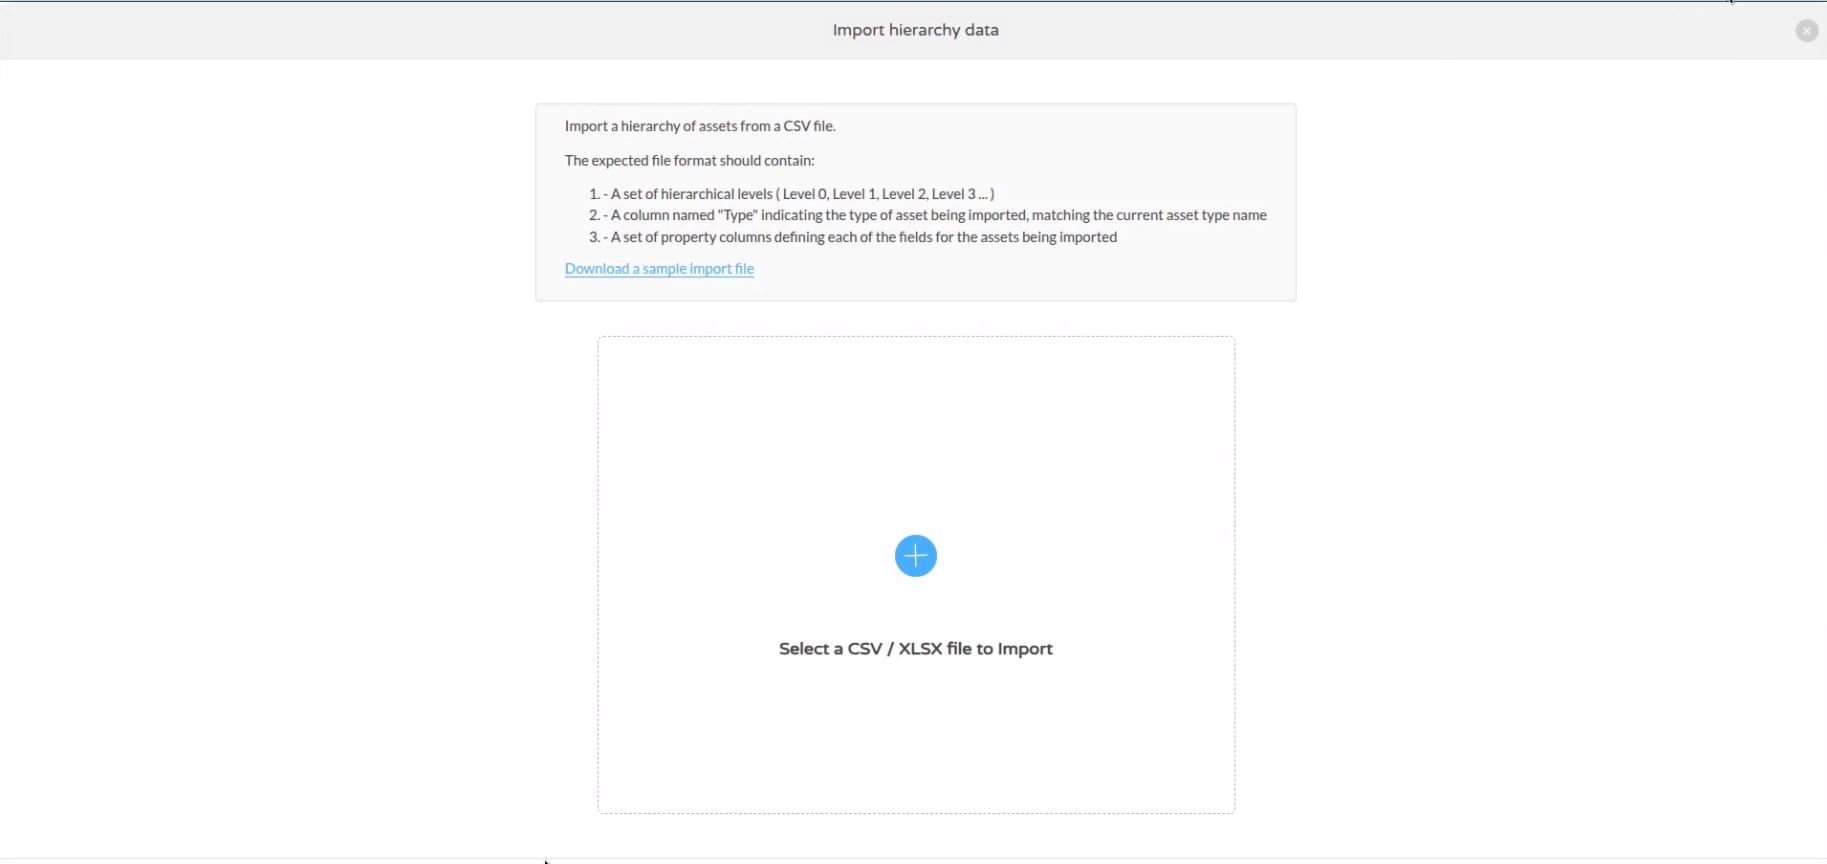
File selection screen for CSV / XLSX import
Step 3: Import Preview
The system shows a preview with a summary tree:
- Total number of detected items (e.g., 36 items).
- Distribution by type (Location, Category, Article).
- Ability to select which parts you want to import.
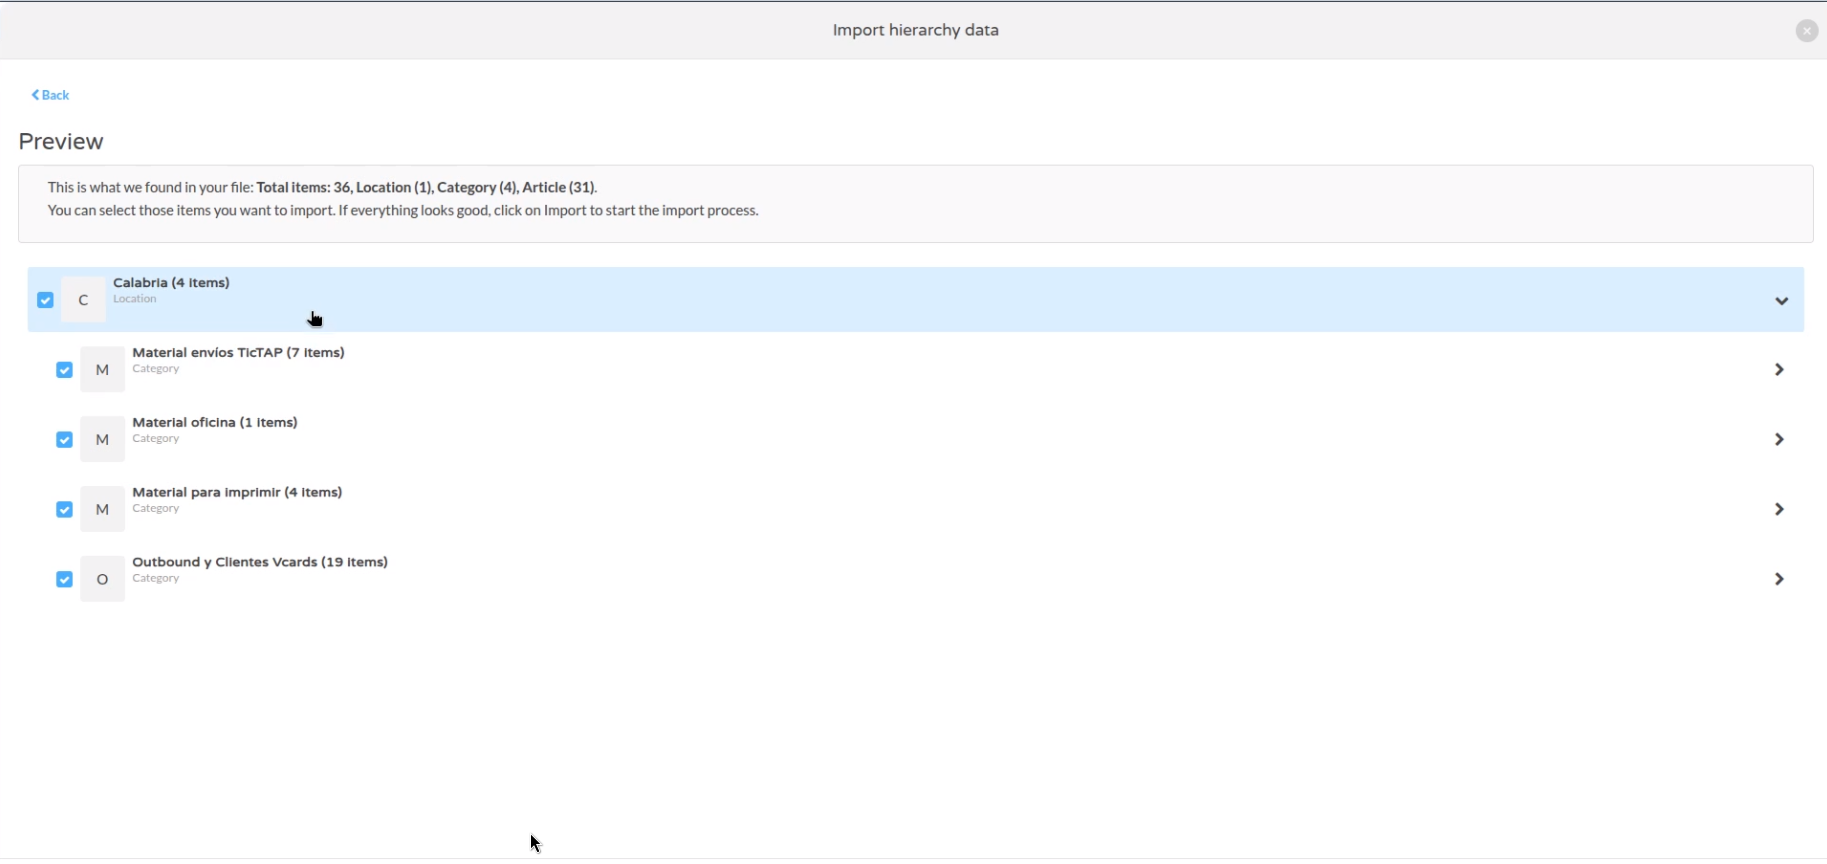
Summary of elements detected in the file before importing
Step 4: Field Mapping
Next, map each column in the file to the system fields for each asset type.
For example, for the Article type, you can map:
- Item level (Level 2)
- Name / Reference
- Last Used date
- Photo (associated reference)
- Quantity
- Supplier
- Minimum/maximum stock
- Stock unit cost
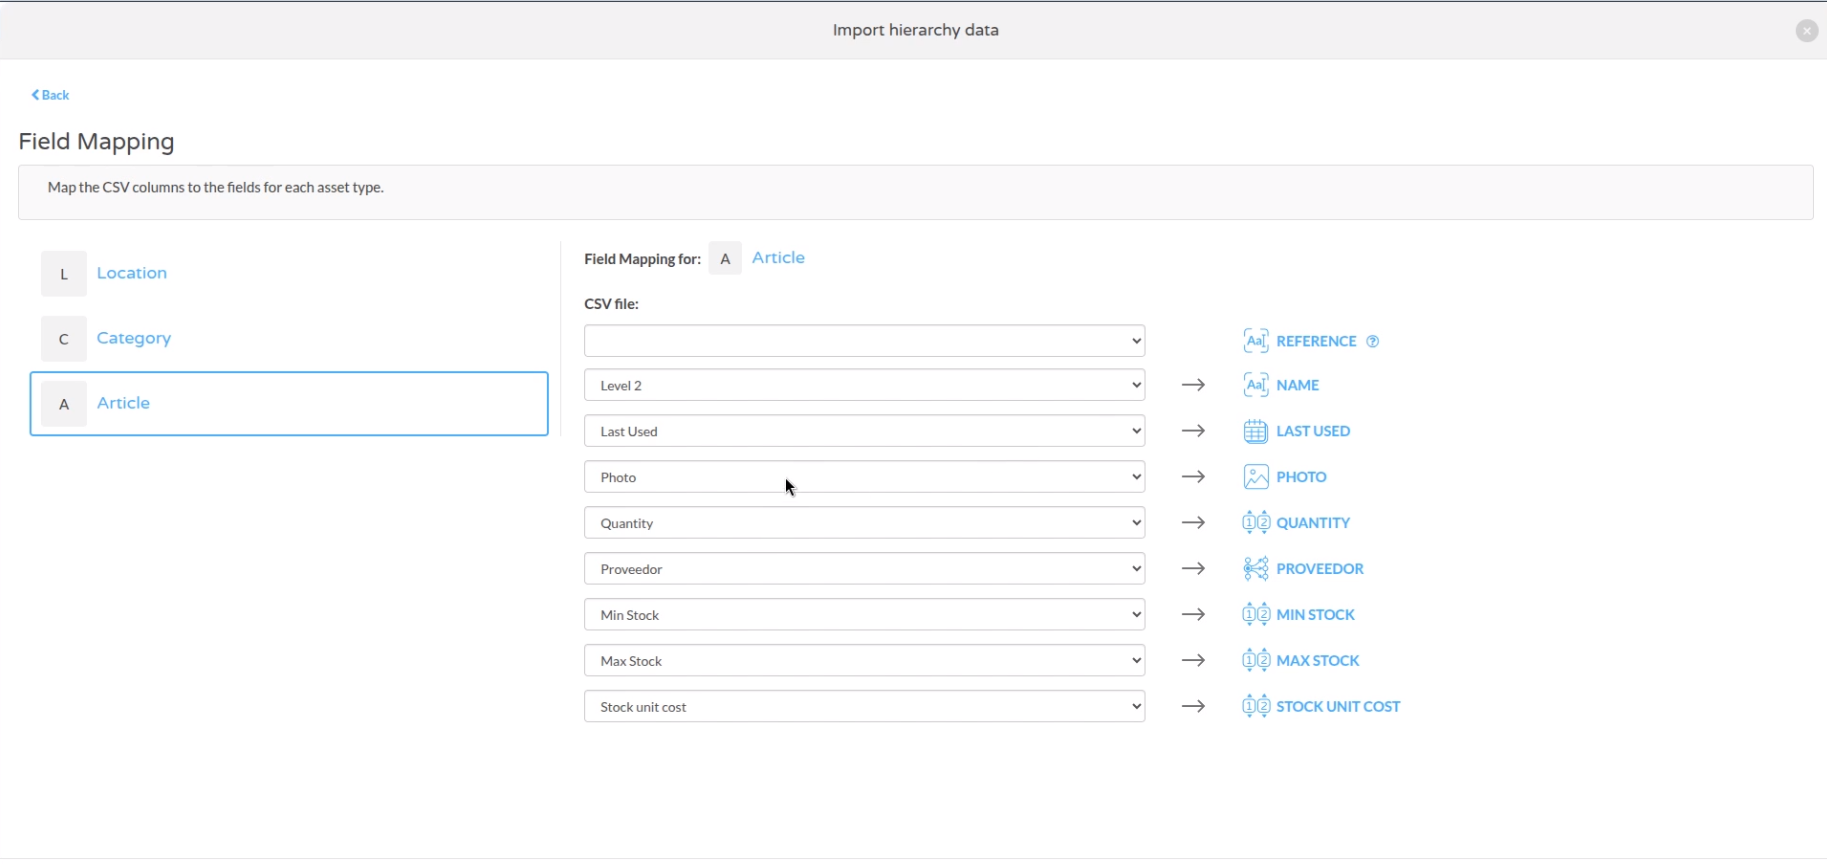
Example of mapping CSV columns to asset fields for import
Key Notes
- For properties related to other assets (photo, supplier, etc.) use the reference to avoid duplicates.
- The file should have flat data without formulas; CSV is recommended to avoid issues.
- Supports import of URLs for images and PDF documents (datasheets).
- The system downloads and assigns these URLs to the asset during import.