Customize
This chapter explains how to customize and work with the specific adjustments for your assets
Asset configuration
Primarily, there are three types of dynamic entities: assets, asset containers and categories.
Assets
The main characteristic of an asset is that a tag can be attached to it. When configuring a dynamic entity as an asset, the application that serves that type of asset must be specified. This way, when a tag is attached to an asset, this tag will automatically move to the application that manages this type of asset, and when visiting the tag, the configured templates for that application will be displayed.
Asset Containers
Asset containers are dynamic entities that allow containing assets within them. For example, a building is an asset container. Inside a building, we can find the assets directly, but we could also find other sub-asset containers. For example, a building can have floors, a floor can have zones, and a zone can have assets.
An asset container can, in turn, be an asset. That is, a tag can be attached to an asset container. The main benefit of attaching a tag to an asset container is to assign an application that allows the user visiting the tag to understand the location of the asset and navigate among the asset park within the container.
Categories
A category is defined by a name and a series of custom fields. Typically, categories are used to expand asset information and define a common space to store information shared among multiple assets. Examples of categories could be model, range, delegation, brand, etc. All of them can contain common information for the assets classified under these categories.
Custom fields
Tags and assets store information through dynamic fields. Dynamic fields are a way to customize what information you want to store within a tag, asset, or even an app. For example, you can create a media type field that stores a PDF file corresponding to an asset's user manual.
There are different types of fields: text field, email field, date field, options field, file field (which can be an image or a file), image gallery (which allows storing many files), address field (which allows storing an address), and relationship field.
Relationship Field
The relationship field type is a special field that allows linking the asset or tag in which it is used with a category. For example, a fire extinguisher can have a relationship field linking it to a fire extinguisher model. This way, common information for all fire extinguishers can be stored within the related model, avoiding repeating the same information for each fire extinguisher.
An asset or tag or app can have many relationship field types. For example, a generator can have a range, and this range is related to a model, and the model is related to an engine. In this way, the generator is related to its engine through the range and its model.
Numeric Field
Numeric fields allow entering only decimal numbers. Thus, if an asset has a numeric field, this field only allows storing a decimal number. If it is not a number, it will be considered invalid data.
Workflows
Workflows in TicTAP allow you to define the different states that an asset can go through during its lifecycle. You can create custom workflows for each asset type, which helps track their status and manage transitions between states, such as from "Ready to use" to "Operating" or "Out of service."
Managing Workflows
In the Workflows section, which can be accessed via the Settings tab, you have the ability to view, create, and edit workflows. Each workflow defines a set of states and transitions, allowing you to manage the progression of assets as they move through their operational stages.

In the image, we see the Workflows section in the application's settings menu:
- You can manage workflows under Assets > Workflows.
- To create a new workflow, click on the Create new button.
- Existing workflows, such as the "Tool Workflow," are listed. For each workflow, you can see the asset types it is applied to (e.g., Equipment, Tool, Vehicle).
- Use the search bar to quickly find specific workflows by name.
- To modify an existing workflow, click the Edit button next to the workflow name.
Workflow States and Transitions
It is possible to edit the different states and transitions between them by editing a worflow. In the following figure, we can see a detailed view of the Tool workflow, showing the different states that assets can occupy, as well as the transitions between those states:
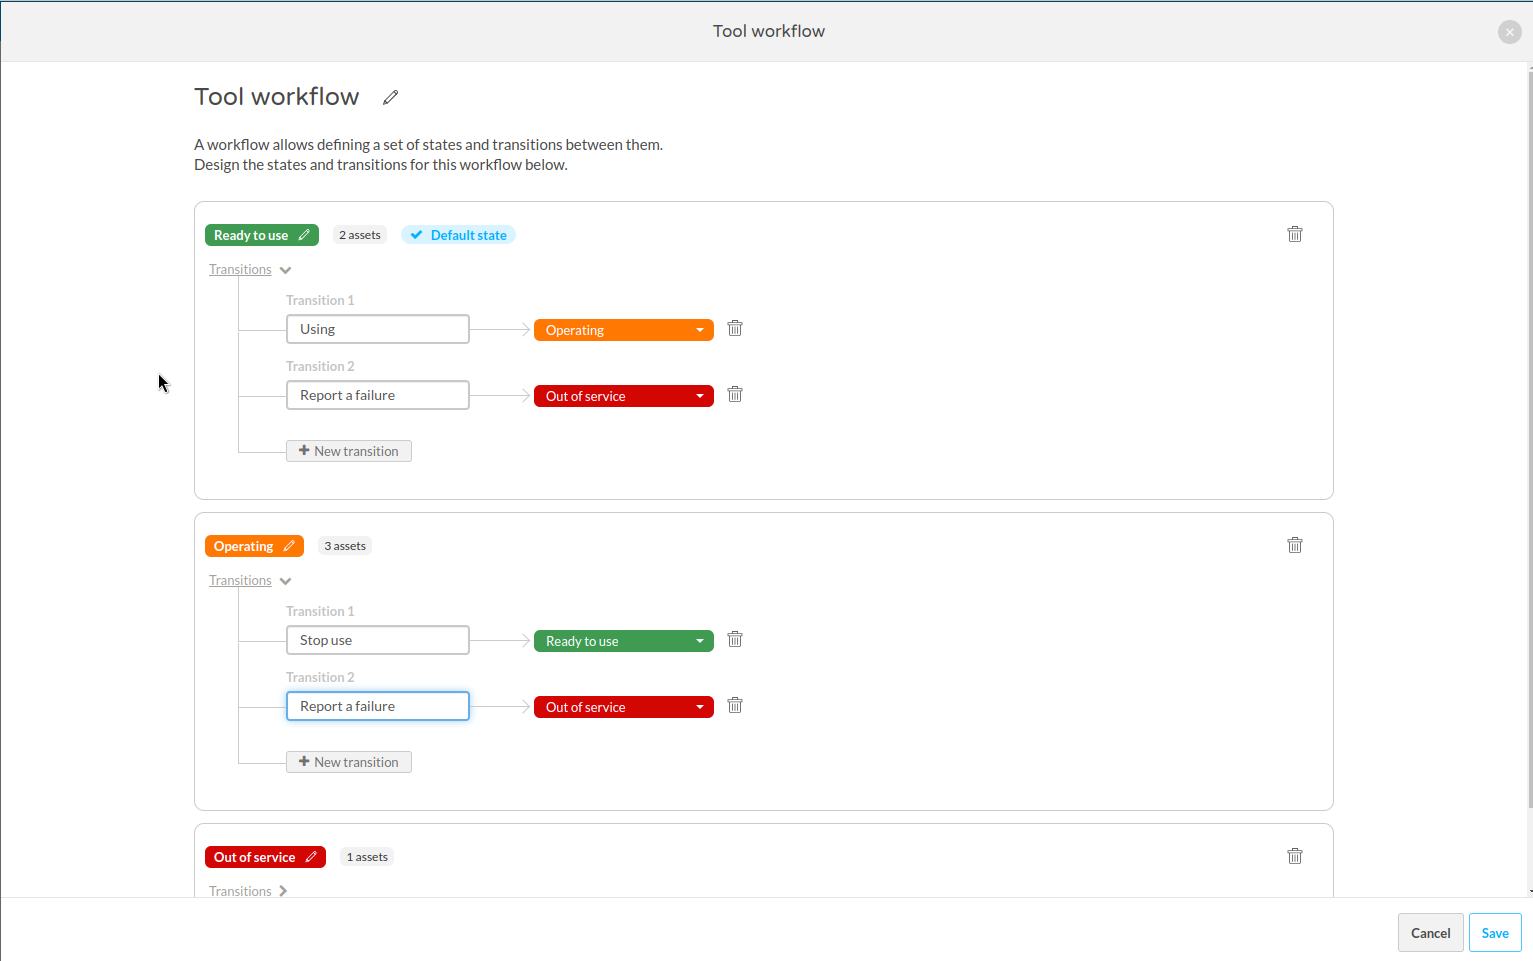
- States: Each state is color-coded for easy identification, such as Ready to use (green), Operating (orange), and Out of service (red).
- Transitions: These represent the possible changes in the asset’s state. For example:
- An asset can transition from Ready to use to Operating by selecting a transition like "Using."
- Similarly, from Operating, an asset can transition back to Ready to use or move to Out of service when a failure is reported.
- You can create additional transitions by clicking + New transition within any state.
- The default state (where assets start) is marked with a blue "Default state" label. In this case, assets begin in the Ready to use state.
Customizing Workflows
- Adding New States or Transitions: You can add custom states and define how an asset moves between them by creating transitions. This allows for flexible management of different types of assets.
- Default State: The default state is the initial state that an asset is assigned when it’s first added to the system.
- Managing Assets: The number of assets in each state is displayed beside the state name (e.g., 2 assets in Ready to use, 3 in Operating).
Once you’re satisfied with the states and transitions, click Save to finalize your workflow. This workflow will now apply to any assets of the defined types, such as tools, equipment, or vehicles, and users can easily update an asset’s state based on real-time conditions.
If you want to know how to apply these worflows to the different asset types, you can check the Asset configuration guide
Maintenance plans
A maintenance plan allows configuring a series of scheduled tasks for one or several types of assets. For example, an annual maintenance plan for CO2 extinguishers. The maintenance plan requires filling out a form periodically, and if it is not done on time, an expired task appears, informing that the plan is not being fulfilled properly.
Maintenance plans generate a series of future tasks, and all these tasks are grouped into an agenda.
In TicTAP, any asset container can display the agenda related to all the assets it contains. For example, in a building, you can see all the scheduled tasks of all the assets in that building. If the building has floors, you can visit the agenda of each of the floors separately.
In addition, TicTAP shows the global agenda of the team, where you can see all the scheduled tasks for any of the locations/asset containers existing on the platform.
Starting the Plan
Despite having configured a maintenance plan, the assets affected by that plan will not have the schedule activated until it is started for the first time. To start a plan on an asset, it is simply necessary to submit the form linked to the maintenance plan. For example, in a quarterly inspection plan for a fire extinguisher, the first time the inspection form is submitted, the quarterly maintenance plan begins.
When a maintenance plan starts for an asset, a reminder will be created that will expire some time after the last maintenance carried out.
Types of Plans
According to the maintenance plan configuration, there are two types of plans: series plans and natural plans.
Series plans cause the expiration date of the next maintenance to always be a fixed period of time since the last maintenance was done. For example, if the last maintenance was done on January 1st and the plan defines an annual period, the next maintenance will be on January 1st of the following year.
Natural plans make the expiration date of the next maintenance be at the end of the configured period, regardless of when the last maintenance was done. For example, if a task needs to be done once every quarter, the natural plan will set the expiration date at the end of each quarter. When the maintenance is carried out within a quarter, the expiration date will be created at the end of the next quarter. Natural plans are used when it is important to ensure that the maintenance of an asset is done within a period of time regardless of the date within the period the plan is executed.
Ending the Plan
A maintenance plan ends when the asset reaches its end of life or when it is deleted. Additionally, the maintenance plan can also be paused. This is especially useful when, for some reason, the assets need to be removed, and it is not desired for the platform to continue sending maintenance alerts.